Showing posts with label photography. Show all posts

Friday, May 23, 2014

A Darwin day

This morning I took off on foot to explore a little of the Darwin in easy reach of the hotel. The hotel is not far from the waterfront so my walk was very pleasant. I followed the signs to the WW2 oil tunnels but instead of tunnels I stopped to take pictures of artwork that was on the way to them.
The neglected and damaged artworks were a challenge to capture under the very shady trees but two of them appealed enough for me to make the effort. The first was a semi-circle of concrete on which were placed moulded flowers – some of which were missing.
The other was again a semi-circle of concrete, this time decorated with mosaic tiles in the form of eucalyptus leaves. These I really liked.
At the end of the pathway I came across a fenced enclosure and got quite a surprise when I noticed a sign board and a peep hole in the fence.
Of course I had to approach the peep hole and take a picture of the screen and the deckchairs. How wonderful to have stars on the screen and stars up above!
Of course my eyes were drawn to the water - there are many ships calling in to this city
I found a set of steps up an escarpment and climbed them to discover yet another piece of artwork to commemorate all the travellers who had landed in Darwin from 1870 to more recent times. This plaque tells you “why”.
The shadows from the trees make seeing the whole of the mosaic a little difficult.
This small section of the mosaic shows how interesting it is and how under-rated it appeared to be – the path was blocked so I had to retrace my steps and I was the only person who was inconvenienced! Not another soul was there except for the young man keeping me back from where the huge crane was operating a little further along the path, and he wasn't interested in art!
Now that I have spent a little time sharing my pictures, it is time I went out and took a few more!
The “Tour”starts tomorrow but the rest of the passengers are arriving this afternoon.

AJ

Thursday, May 22, 2014

Sunrise to sunset - From Home to Darwin

How exciting! This is day one of my trip to Darwin and the Kimberleys. A trip that has been a “dream”of mine for such a long time. The cameras (three of them) are primed and ready for action. Colin has been left at home to “keep the home fires burning” - he is not as keen about exploring as I am! However he did ferry us (son Steven and me) to the train station at sunrise.
The one and half hour train trip was quite uneventful, it was quite amusing to see how the travellers were seated so close to each other and yet managed to remain isolated from each other by either studying their smart phones or by staring blankly! Steven and I chatted to each other and stood out from the others because of it!
Once in the airport we checked in and I bought a very welcome cup of coffee. I was so ready for it!
Little Daffy bear posed for a few photographs along the way and was getting a bit weary by the time we sat in the transit lounge waiting for our plane to be called. It is tiring being so popular.
At last we were on our way. It was clear enough to take a shot out of the window as we left Brisbane – but we did not fly over the city so my photo is of the suburbs near the airport.
When we were approaching Darwin over the Gulf of Carpentaria we crossed over a few little islands, I couldn't resist taking another aerial shot because one of the islands was reminiscent of a manta ray, the row of little clouds formed the “tail”.
Once in the airport and the phones turned on I rang Colin to tell him we had arrived and Steven rang Lydia to tell her! At least we have our priorities right even if we both have left our partners at home!
We waited out the front of the airport for a friend (Susie) to collect us and I shot of yet another picture of the totems by the kerb.
I had heard so much about the Mindel Markets and this evening I eventually managed to see them. 
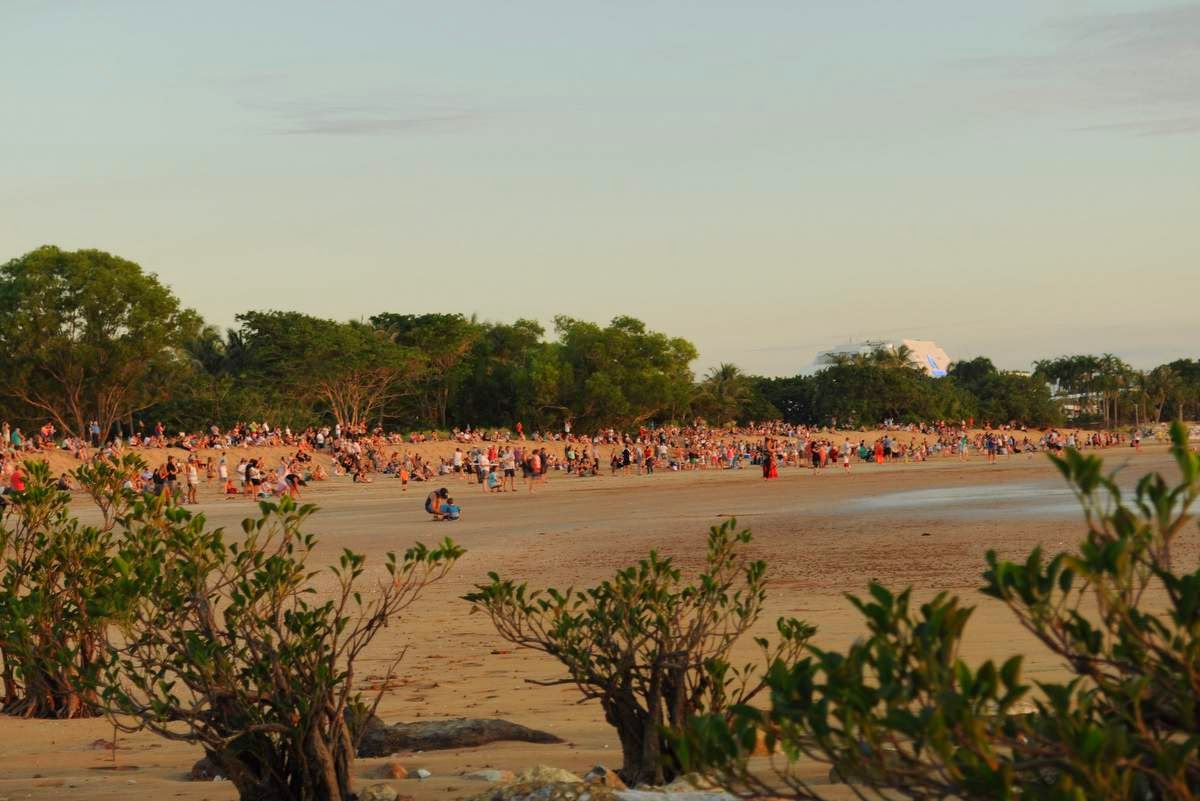
The sound of a didgeridoo player and drummer filled the air and we were drawn to the sound. A large crowd had surrounded them but I still managed to take a little video of them. What a wonderful sound. The “didge”player was using four different didgeridoos at the same time, each had a different tone. On the top of the sand dune behind the players were two little boys silhouetted against the evening sky, dancing to the rhythm. They were fun to watch. They were so unaware of being seen. Of course we had to go onto the beach to watch the sunset. 
It seems that all the tourists in Darwin had gathered on the beach to do just that! They made a wonderful shot too!
To draw my ramblings to a close, here is one of my sunset pictures. It was worth lugging the camera along!
AJ

Thursday, June 13, 2013

Maria's travels

One of our "Visions" members left for a very special holiday on Monday and since communication with all her friends is so difficult when travelling abroad I promised to put her travel stories here in my blog. When there is no access to the Internet, Maria will write post cards and letters.
Here is Maria's story so far . . .

Driving  to the airport in the wee small hours.
MONDAY: As you can see we made it to the airport and the next best surprise is that my iPad is working and I was even smart enough to transfer photos from my camera while sitting here in amazement..  Just love all of this technology.
So far I can't remember anything that I've forgotten, John has had his morning coffee and I am wondering what to do with myself for the next 3 hours.  Last night I downloaded a couple of books onto the iPad but I'm feeling too excited to just read... 👯
I also found out how to access emoticons from the iPad keyboard which I must share with you when I get back home.
Well looks like when I'm at airports and hopefully hotels, I will be able to let you know what we have been up to.
The foyer of the Airport Hotel in Singapore
 TUESDAY: It is just wonderful to be off the plane and walking around the airport trying to get in some exercise before going to bed.  It is 31 degrees with a delightful warm breeze.  We are staying at the Airport Crown Plaza and it is gorgeous.  Tomorrow morning we are up at 5.00 am and will be flying to London in a new 380 Airbus. I will try and get a photo of it on the inside.  We are currently having our "happy hour" drinky poos.  Thank you for alerting me to the free wifi at airports, hotels etc. I am learning heaps more about my iPad which is exciting.  We had champagne with our breakfast.  A guy sitting next to John typed on his laptop for the whole duration of the flight .. what was impressive was how his fingers just flew over the keyboard so it became obvious he was keeping up with the flow of his thoughts.  One baby on board that cried on take off and landing .. what an angel as I thought we were in for the long haul. Not sure when I can write again but hopefully soon.  Must go as John has finished his drink.
Maria and John in the 'plane

 WEDNESDAY: John and I tried to leave the airport yesterday without our luggage or going through immigration.  Now that gave us both a BIG BIG fright as it brought to our attention that we are not the sharpest knives in the drawer anymore.  Boo hoo!! We hardly slept last night as we were on tender-hooks worrying about the alarm clocks not going off.  I know, hard to believe.  It's pouring over here but still so lovely and warm. 
Unmistakably "LONDON"

THURSDAY: What can I say about the weather in London?  Grey, wet and very cold and everybody has complained that the sun has only shown itself for about 4 days in the past year, and that happened last week!  The wind is really blustery which has stirred the pollen and yesterday was difficult as everybody was sneezing and holding handkerchiefs to their noses and at the same time trying to protect their eyes from grit that was flying all around.  Apparently there is a lot more pollen in the air than usual due to the abnormal amount of rain that fell during winter.

London is getting ready for the Queen's Birthday which is going to be celebrated this Saturday and of course the Trooping of the Colours is going to be the main event which John and I will miss as we will be driving down to Dover to board the Ryndam for our cruise to see the Fjords of Norway.
 
With this picture of a grey squirrel among the daisies we leave Maria's story for today.
With the technology that we have today, keeping in contact across the miles has become so much easier. Personally I did not expect photographs with Maria's emails - but of course the iPad is a camera as well as an email device and can be used in the same way as a smart phone! I am learning!
AJ

Friday, March 8, 2013

Colour after the rain


The soil is so wet that walking on the lawn covers shoes with liquid mud but Colin had told me that the little piece of frangipani that he brought home for me seven years ago had flowered and I just HAD to go and see for myself! Although I stepped slowly and very carefully I had to remove my shoes before I could get back indoors! But I saw it – the most startling deep red, almost a plum coloured bunch of florets.
 My photo actually does not show the true colour, it is darker than this. If I had made the flowers as dark as they truly are you would find the picture to be less striking. It is so beautiful. Now that it has flowered this first time it should now grow and have lots more flowers next year. I hope so!
Once outside in the garden with a camera in my hands I could not return indoors without finding a few more blooms to capture!
This little bush of blue daisies has been flowering non stop for weeks. I don't do anything to it but this rain has made it grow even taller!
For some strange reason the daylilies that come out in November have started flowering again.
I have several of these yellow and red daylilies out at the moment, rather than take the usual shot from above and looking down at the long pollen covered stamens I opted for an “under the lip” shot! The three corner palm stands in the middle of the garden and is providing the pattern of leaves in the background.
Since the rain the dahlias have taken off. It is not long since I cut them all back and had not had the time to lift the tubers, they are all very bushy and healthy and one has surprised me by producing a different coloured flower.
I thought that all of my dahlias were dark red – the same colour as the frangipani. But one is a pretty salmon colour. I know that I “rescued” a sick dahlia from Bunnings last year that didn't have a tag on it so maybe this is it! Its definitely not sick today.
Seeds that came from plants that grew here last year have produced marigold plants that actually need thinning – one of them is flowering already.
The splash of orange makes an almost luminous glow in the garden.
And finally one of my miniature roses – the rose bush refuses to be miniature but the exquisite flowers are not very large at all.
If you were to make a circle with your thumb and middle finger the rose would fit in there. The leaves are a bis of a mess but the plant is otherwise healthy and has lots of these little flowers – and a few baby grasshoppers too.
I do not use chemicals in my garden at all. We have lots of birds and lots of lizards and I have no desire to kill any of them so I do my best with companion planting and soapy water! Not as efficient as the chemical treatment but it keeps me happy!
AJ

Wednesday, March 6, 2013

In the red

Although it is still showery today after a week of rain and grey clouds and showers, there were enough bright times for me to venture out with  my camera and the new 720 IR filter that I had just purchased through Ebay. I tried to get to see the volume of water in the Little Nerang Dam, which is only a few kilometres up the mountain from where I live. Half way along the narrow, windy road leading to the Dam, an iron gate stopped the car. Access was denied! I turned the car around and decided that if I couldn't go to the dam then this would have to do for my first attempt. The sun was coming and going so quickly that I felt that I would not have many opportunities.
The beauty of the internet is that there is lots of information for those who look for it. I had read up several articles that had been written about how to use an infra red filter so I knew roughly what I should do.
The filter is so dark that it is impossible to see through it. All automatic features on any camera are useless. The advise I had taken was to set up the camera on a tripod, have a low ISO to avoid getting too much "noise" - the camera was already set on 200, so that is where I left it.
I focused on the scene without the filter and with the camera set to Manual Focus.
The IR filter was then carefully screwed into place without changing the position of the camera or the focus ring. The shutter speed was slowed down to 2 seconds - I felt  that I should start somewhere and slow the shutter speed further if the image on the LCD screen was too dark.
The Aperture I set to f/8
It looks pretty gruesome but this is how my first picture came out. I had been spot on with my settings and there was a good histogram shape from dark to light.
This was pretty exciting stuff! (don't you love experimenting? I do!)
I turned the camera around and took a shot in the other direction  - but before I show you that shot I will show you what Photoshop Elements allowed me to do with this picture.
I opened the picture in Adobe Raw to start with to brighten the dark area on the right and then in Elements went to Enhance - Convert to Black and White. There are several options and I chose "Infrared Effect" and tweaked the sliders to get this result. I moved the red slider much further than the automatic adjustment suggested. This feature in Adobe Photoshop Elements is usually applied to a naturally coloured picture and my picture was monochrome red.
Here is the same effect used on the second picture I took.
This also was a two second shot but after carrying out the same sort of adjustments I did one thing more. The sky was ultra bright so I selected Enhance - Color - Replace color and selected a sample from the sky and changed the fuzziness to make sure that it was only the sky that showed in the sample window, then I simply moved the "Lightness" to the left to darken it. I was surprised to see that there was actually a variation in the sky. The darker sky certainly made a difference to the overall look of the image.
Incidentally, that is the gate that barred the way to the Little Nerang Dam!
Off I went to another location not very far from this, where there is a small park containing a picnic shelter.
This is one of the shots I took there - this time the exposure was 5 seconds (light fading by now) but still reasonable results.
I am sure that using the more sophisticated full version of Photoshop CS5 that different results can be achieved with the shots that I have taken. I believe that Infrared photography works much better when the sunlight is really bright. So I will be having another try another day!
AJ


Thursday, January 31, 2013

On the edge

Apologies for my absence - blame it on the horrible weather!
Today I would like to show you how to use a method of sharpening an image that is a little different.
You may possibly have heard about it before - especially if you read magazines and seek out tutorials.
This method is for those of you who use either Photoshop (most versions) or Photoshop Elements. These are the two programs I am most familiar with so are the ones I can help you understand.
To find something to demonstrate the sharpening I first needed a photograph so leaned over the veranda railing and took an shot of the fruiting body of a large Cycad, it erupts from the surrounding leaves like a botanical volcano, rising in a large dome of leaf shaped florets which will go on to open out to eject large chestnut ("conker") sized seeds.
First duplicate your picture to be sharpened by holding down the Ctrl key and tapping the J key once. Look over into the Layers Palette - you will now have a background and a copy of it that has been called "Layer 1"
Now click on Filter then on Other and High Pass

A pop up box with a slider will appear and at the same time the picture will alter to look like embossed pewter. This appearance makes it so much easier to see the edges, Move the slider so that those edges look well defined.
As a rough guide, try moving the slider between 9 and 14. Don't worry that you will make the edges artificially sharp, you can tone that down later. You need to experiment first to discover what this effect will do.
Click OK and go to the Layers Palette at the right of your screen. Click on the word "Normal" we shall now change the blending mode. When the drop down box of possible choices appears, click on "Overlay".
The picture does look more "Normal" now - but if you chose a large number for your sharpening it could look a bit too corrected and "hard". Now you can modify the strength of the sharpening you have applied. But before you do. . . .
Can you see the "eye" to the left of the "Layer 1" thumbnail? That is the visibility eye - open and you can see the layer, closed and it does not show. Click on the eye - it doesn't close, it actually disappears, click in the empty space where it was and the eye will return.
Now do that again and look at the picture you are working on. Click the eye on and off and see the difference.
Is the sharpening too much? My sharpening was. If you sharpening is too much, reduce the opacity of the layer - this you can do by hovering the mouse over the word "Opacity", and left clicking and dragging to the left when the double arrows appear - OR - you can click on the down arrow beside the word "Opacity" and drag the slider to the left. While you are making changes keep a watch on the picture, not on the slider.
(All the pictures in this article can be seen larger by clicking on them.)
When you have the amount of sharpening that you feel is right You can do one of two things.
You can
  1. Flatten the image (right click on either the layer or the background in the Layers Palette and click on "Flatten" and save the image.
    or
  2. Erase the background around your main subject - so that the sharpening is only applied to the main subject, then flatten the image.


The other way of sharpening a picture is to use one of the Sharpen Image options in the program. Here is a comparison between the Sharpen and the High Pass method of sharpening.

When I sharpened the rose with High Pass I deleted the sharpening effect from the background. Click to enlarge the picture and you will really see the difference.
I am not going to say that one way is better than the other. You sharpen your images in a way that you feel comfortable - but never shut your mind to other suggestions - always give them a try and make up your mind after experimenting.
AJ


Saturday, January 5, 2013

The fruits of our labour

This morning I spent time picking up macadamia nuts from the lawn. In previous years the sulphur crested cockatoos have left us only a handful of nuts but this year there are enough to warrant gathering them - they are not ripe until they fall from the trees. Only a few are left on the tree and this is how they look
(Click on the pictures to enlarge)
F5.6  1/100  55mm  ISO 200
Of course you can recognise the nuts more easily from this picture.
F10  1/50  55mm  ISO 200
I deliberately left the outer casing on a couple of them so that you can see how they develop inside a tough inedible fruit. The shell around the nut is so hard to crack that only a vice will do it - using a hammer results in the nut shooting off in one direction or another unscathed or else the edible part of the nut is crushed between shards of smashed shell! How the cockatoos manage to bore holes into the casing and get at the inner soft nut, I really do not know - but they manage very well indeed! There were plenty of macadamia nuts on the ground with round holes in them and no soft flesh in the middle.
Living in the subtropics the climate is not suitable for apples and pears - however we did manage to find a "tropical pear" which we planted many years ago and has borne up to six pear shaped fruit each year - but full of Coddling moth grubs so we haven't managed to taste them.
This year, for some unknown reason, the tree is absolutely laden with fruit.
F10  1/50  40mm  ISO 200
As you can see there are quite a few pears on the lawn under the tree. to begin with I picked up and started to prepare the fruit from under the tree, thinking that they would be riper than those still hanging - but all but one were bruised inside from the invasion of little hatched coddling moth grubs. Back I went to the tree again and this time picked a bucket full from there.
F10  1/80  40mm  ISO 200
This time the fruit was free of grubs - but extremely hard and woody. I boiled the pears in sugar and water with half a teaspoon of cinnamon. It took forever for the fruit to soften. When I tasted the fruit all it tasted like was sugar and cinnamon! The pears have very little taste to them, I guess I will leave them to the coddling moths and the fruit bats! I will not remove the trees, at least they provide food for some creatures!
Our mangoes are just coming into season now. They have been in the fruit shops since before Christmas but the ones on our trees are not ripe yet.
F8  1/20  32mm  ISO 200
I did pick three of them and have put them on the window-sill to ripen. What happens when the fruit is close to ripe is that the fruit bats from all over South East Queensland come to my garden and demolish everything and finding a fruit that does not have a bite taken from it is very difficult.
There are also fruits that I will not be able to reach that are hanging over the creek at the bottom of the garden
F8  1/20  55mm  ISO 200
We may have to devise some way of putting a net onto a long pole to capture that fruit above the water!
Walking back to the house after checking the fruit trees (we live on a one acre block of land) I passed the last of our orange trees. Over the years there have been so many floods come through where the citrus are growing that only one tatty tree is left standing.
F8  1/50  35mm  ISO 200
Once again we do have trouble with the Sulphur Crested Cockatoos among the citrus - they know which of them have seeds - they loved the lemons so much that we only managed to pick a handful. While the fruit is as green as the orange in the picture above, the birds would fly into the tree and tear the fruit apart to get at the lemon pips! (Now you know why they have yellow feathers on the top of their head! Its from all the lemons they eat!)
So we only have one orange tree left where we once had eight. I shall purchase more but will have to plant them on higher ground since each year there is a deeper flood as more and more people put fill into their low ground to stop THEIR flooding - it is forcing the floods further and further back. If it raises much higher we will have to move the big shed!
Just one more fruit picture for luck!
F8  1/50  48mm  ISO 200
I doubt if we shall ever be self sufficient with our fruit growing but we do manage to keep a lot of the native wildlife happy!
AJ
joanren@gmail.com

Sunday, December 30, 2012

Faded beauty

I was tidying up in the garden today when I realised that some of the plants, although past their prime, were still very eye catching. Since most people do not bother to admire a flower except when it is perfect I decided to share the things that caught my attention this afternoon.
First the red Eucalyptus tree that I am hoping will grow to be a massive and brilliant specimen tree - but at present is only a couple of pretty branches that reach up about two metres. The fluffy flowers have about finished and the cups that hold the growing seed are left. They create a different sort of display which is attractive.
The stunning heads of blue from the many Agapanthus that were clumped together in the front garden have lost their petals and now are green bunches of seed pods. Most of these I have already cut off and put on the compost heap but a few have been left to provide a sculptural interest in the garden.
Replacing the Agapanthus and Eucalyptus blue and red are many heads of a very tall and severely dangerous (lots of hooked spikes along the sides of the long leaves) Bromiliad. The flowers that come from each of those bulbous tips are quite uninspiring but the huge heads that you see here stay looking like this for weeks and most people who come to visit stop and admire them. So even though the plant is past its prime it is still very attractive.
The pollen producing body of the male cycad has dried out and the seeds have been dispersed but this pendulous shape will stay like this for several weeks before breaking up and needs to be cut away. Again this is the end of the plant's usefulness and yet I will keep it where it is because I like it!
Finally the seed pods that hang from one of the Cassia trees. Actually the Cassia are a real pest - they pop up in the lawns everywhere and have to be mown down or pulled out or we would soon have a forest of them. But the seed pods have their own beauty - the flowers are pretty - like lots of yellow buttercups - but the seed pods with their fluffy soft seed coverings now adorn the trees and while they look attractive I can visualise all those seeds floating in the wind and landing all over the back and front gardens!

For those of you who are interested to know how I took these pictures and managed to get such a soft background, I used the 55-300mm lens at full zoom. I also set the Aperture to a small "F" stop to ensure a narrow depth of field. Since many of you prefer to use a compact camera - just use the zoom to get close and throw the background out of focus.
Notice how I managed to get something dark behind the subject? This helps to push the subject to the foreground and grab the viewers attention. A bright sky background or a house or fence even, would take that attention to the background. It takes a bit of practice but if you can see what is behind the subject before you take your shot you will get a much better photograph - sometimes moving a few inches to one side improves the way your shot will look.
AJ