It would be really nice if there was an easy way of creating a line drawing from a photograph. I have downloaded filters, used various filters in Photoshop and have tried many stand alone programs that aim to create line drawings.
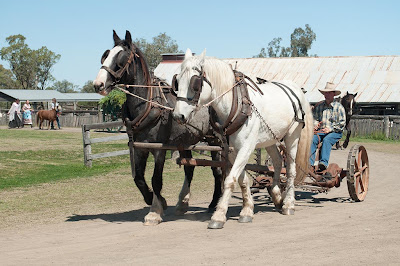
Here is my photograph.
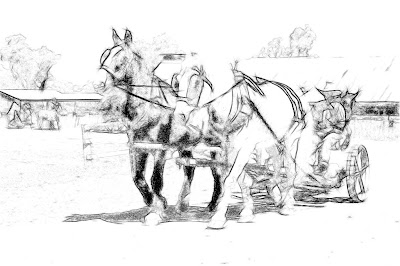
an here is the line drawing from the best of the downloaded programs I have tried - this one called "Fotosketcher"
The results are not brilliant - the colour sketch was impressive but was not the line drawing I was after.
So, I resolved to create a sketch that I could give to my grandchildren to colour-in.
This is the sketch that I made from the photograph.
Here are the steps I took to do that.
To begin with I created a blank layer above the original photograph. (Ctrl+J in Photoshop Elements)
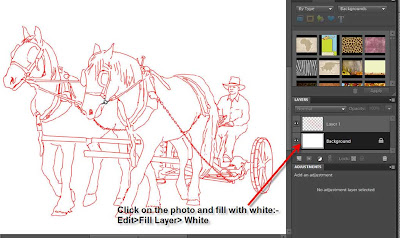
With a smooth edged brush and a contrasting RED as the foreground colour I zoomed in on the picture and started to draw around the edges of the horses.
Using red it is so much easier to see where I had been - I started out using black but soon gave up because the black was lost in the black areas of the shadows.
I use a graphic tablet so drawing around the horses was not as difficult as if I were using my track-ball mouse. I soon found that I could start the line exactly where I wanted it to start with no hovering about to see where the cursor was. The secret is to zoom in very close.
Once the outlines and harness details had been drawn I then clicked on the background and filled it with white. (Edit>Fill Layer>White )
I found that I had missed out the detail of the bit on the white horse so had to click "Undo" to remove the white and fix the problem. Once done I could fill the background with white once again.
Of course I did not want a red sketch, I wanted a black and right sketch.
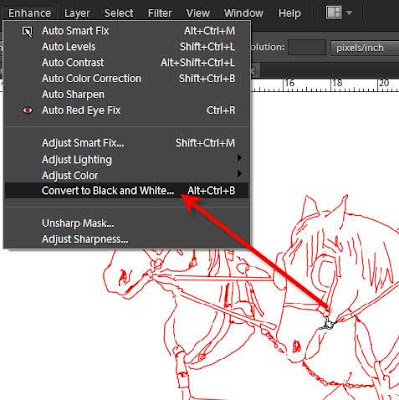
I clicked on Layer 1 - the red sketch - and from the Menu bar clicked on Enhance>Convert to Black and White.
There are a few options to choose from - I found "Portrait" to give me the blackest lines.
The very last thing I did was again to go to the Menu Bar, click on Layers>Flatten image.
So now I feel I know how to create my sketches without the use of filters or special programs! DIY.
AJ
I would like to show you the variety that is within Australia starting with my own area south of Brisbane. My love is for photography and video. Photoshop is a fun program to use to improve any photo and I have been working with photoshop since version 3 - I now use Photoshop Elements. For video editing I use a variety of programs the main one being Adobe Premiere Elements. I look forward to have you visit occasionally. AJ
Saturday, September 15, 2012
Wednesday, September 12, 2012
more colour changing
Continuing from my previous instructions on colouring a photo by creating a new layer for each different colour (and labelling each layer) I will show you how to change the colours even after you have moved on to a different layer.
I decided that I would see what different colours would look like on the baby dress.
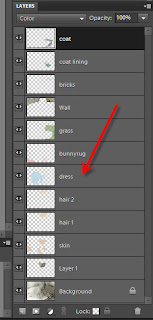
In the layers palette I first clicked on the dress layer
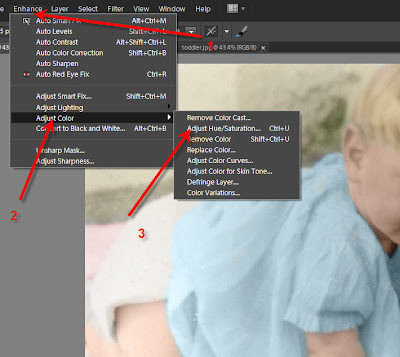
Now click on Adjust>Adjust Color> Adjust Hue/Saturation.
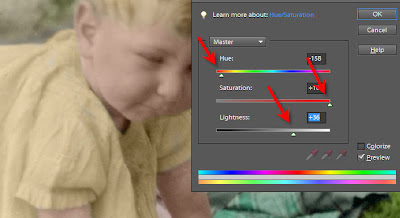
When the Hue and Saturation box opens slide the HUE slider from side to side to see the different colours that are possible. When you find one you like, stop sliding and click "OK"
Have another try - go to Adjus>Adjust Color> Adjust Hue/Saturation. This time, slide the other sliders, the Saturation and the Lightness sliders to see what you can create.
Once you have completed your picture to your satisfaction, flatten the image - Go to the menu bar and click on Layers>Flatten Image (right at the bottom of the drop down box.
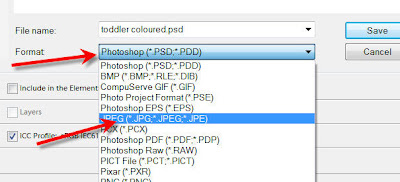
Save as a jpg image - if the picture is not flattened it can be saved with all its layers. It will be saved as a .psd image file.
Once it is flattened you will need to change the "Format" to "JPEG" or it will again be saved as a .psd image and email recipients will not be able to see it.
Have fun with your colour changing.
AJ
Monday, September 10, 2012
Bringing an old photo to life
Today I had a little time to play on my laptop. I have always been a Photoshop (CS) user but since so many people use Photoshop Elements these days I have been making myself work with this very handy photo editing program so that I can offer help to those that need it.
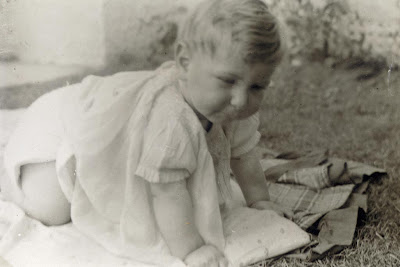
So finding a delightful photo taken in 1944 I decided to have a try at bringing it into the modern day - very few people could afford colour photography back then so black and grey it was! Once I started on the transformation I started to take snapshots of the different stages. This story would be far too long and very boring if I gave you each and every step that was taken so you will need to "read between the lines" occasionally. I don't think you will get lost.
The first thing that should be done is to remove bad spots and scratches. The magic healing brush does a great job of that - make the brush size just a fraction larger than the black or white spot and simply "dab" it with the brush. Take care when dragging the brush along scratches, that sometimes makes a worse mess than is there to start with. Major scratches may need you to use the Clone/Stamp tool. I cheated . . . I only took away the spots on the skin and the little dress, I felt that the child was the important part of the picture and no one would notice what was in the background.
Here is the original photograph.
Now for the steps on how to add the colour.
To begin with you need to change the mode from greyscale to RGB. Click on Image>Mode>RGB Color. If this is not done you will not be able to add any colours at all.
The colouring can be done in any order. for each new colour create a new blank layer and paint onto that. Never paint directly onto the photograph.
With this photograph I clicked first on the "Add new layer" button on the extreme left of the Layers Palette (In CS5 this button is on the extreme right)
The painting is done on the layer, not on the photo.Click on the foreground colour box (the top one of the two main colours at the bottom of the tool bar) and put these numbers in
R . . . . 227 G . . . . 183 B . . . . 151 and click OK
You do not need to remember these numbers, I have given them to you as a quick start so that you know for the future where the colour is sampled for skin colour. At this stage it does not matter that the colour is too pink or too yellow, I will show you how to get it right.
Select a brush tool and select the brush shape that has a soft edge, not a smooth edge.
In the Layers palette change the blending mode from "Normal" to "Color".
Paint over the face, hands and legs - if there are more than one person in the picture, only do the skin of one person.
Zoom in very close and take your paint colour to the very edges, use the eraser to clean up any over spill.
The skin has been coloured but it may be an un-natural colour so we now fix it!
Click on Enhance>Adjust color>Adjust color for skin tone. In the pop up box that appears you can work real magic. Click the eye dropper on the skin - not the deep shadow or even the brightest part, there will be an automatic change to the colouring. You may wish to add a little more yellow or change the white balance - experiment with the sliders. You will only see a change when you release the mouse button so make only little changes.
Once you have the skin correct you can move to the next part to be coloured.
Add another layer by clicking on the Add new layer button and, once again, change the blending mode to "Color".
It is sensible to name each of the layers. Click twice on the writing and you will be able to type over the highlighted letter.
You will end up with lots and lots of layers.
With each of the layers renamed it is possible to go back and change things or paint in little bits that had been missed.
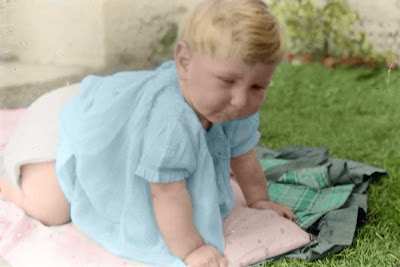
Here is the end result of my efforts with this photo.
Under all the layers is the black and white photograph, the colours are transparent and allow the shading and textures to show through. We have a wonderful program to work wonders on our old photographs!
AJ
Subscribe to:
Posts (Atom)
