Tuesday, June 22, 2010

Next step with Selective Color

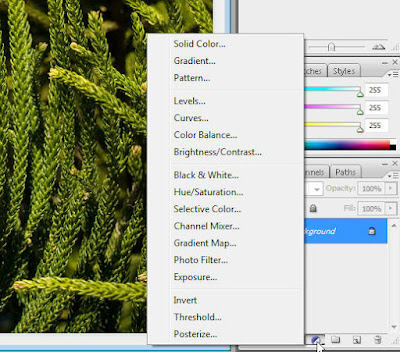
Continuing on from yesterday's tutorial on using Selective Color - I would like to show you how to determine just what is affected by the colour change.
We shall take the same photo we used yesterday but this time I am going to change the sky. The lower left of the picture is really over exposed and white and I would like this to be changed to blue.
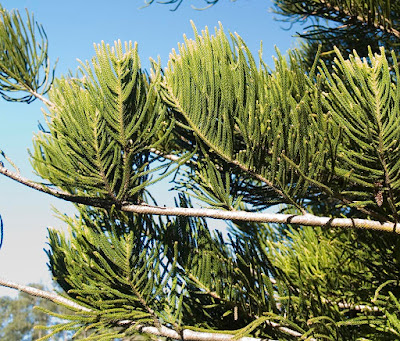
To begin with, duplicate the layer and click on the round button that is half black, half white. Select white as the colour to be changed and slide the colour sliders and the black slider to change the white to match the blue at the top of the picture.
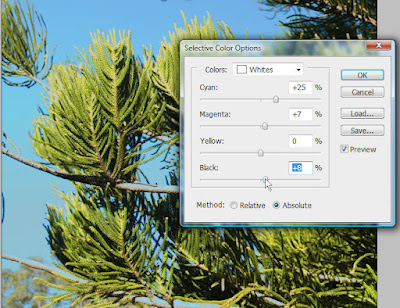
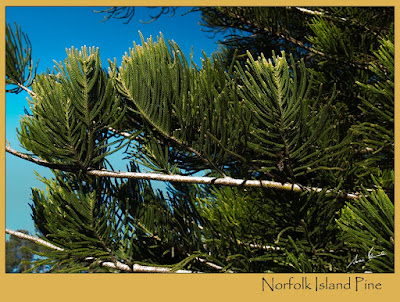
You will notice in the layers palette that there is a white box beside the Selective Color symbol. This is a "reveal all" mask.
Click on the white box.
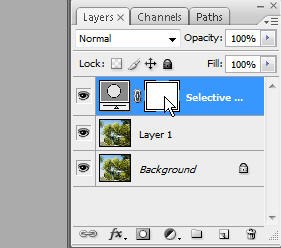
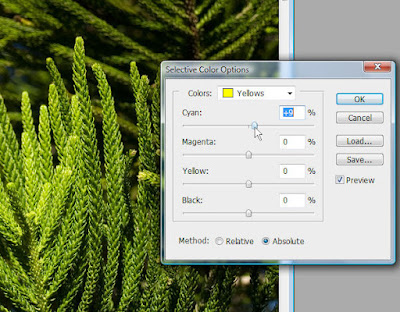
Now select a soft edged brush and with black as the foreground colour paint away the blue that is in the wrong places - in my picture the white of the branches and tips of the leaves has also been changed to blue. 
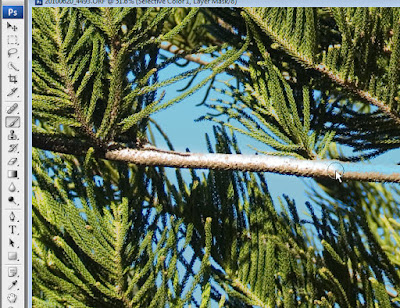
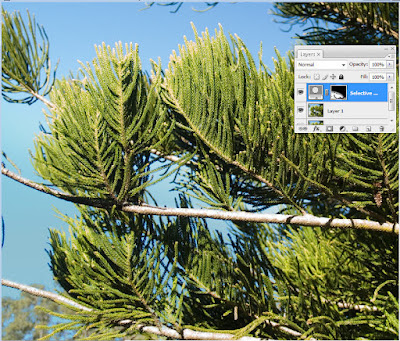
You will need to use the magnifier to get in very close so that you can be accurate in your brushwork. Zoom in and take care as you paint - it required a very small brush to remove blue from the tips of the green leaves and I would not even have seen that it needed doing until I zoomed in.
Zoom out and enlarge the brush and paint over the upper part of the sky and tree where the original colour was stronger. You can see on the tiny image of the mask where the brush has been worked (on the picture above).
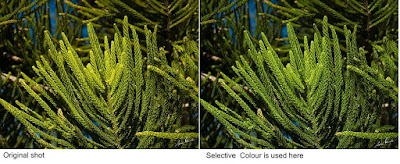
Here are the before and after pictures.
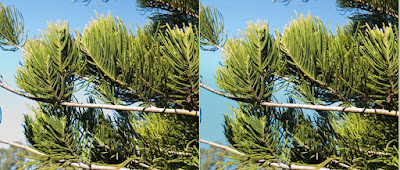
The left hand picture has the white in the sky and the one on the right has more colour. Too much colour would be artificial, so try not to be heavy handed!
AJ

Sunday, June 20, 2010

A Photoshop tip

I had some fun with my camera today and once back on the computer continued to have fun - playing around with Photoshop. There is one little tweak that I would like to pass on to you. It is a really useful and natural looking manipulation to the colour in your photos.
The subject I used was very simple - a branch of a Norfolk Island Pine tree.
What colour would you say the "leaves" were? Did you say green?
When it comes to working with colour in Photoshop you may be surprised to learn that actually most things you see that are green are actually YELLOW. Grass is yellow and so are most of the leaves on the trees - and they contain a varying amount of cyan and magenta and black.
That all sounds very muddling, doesn't it! Look back at that picture of the Norfolk Island Pine, can you now see yellow?
If you have a photo of trees or a grassy paddock, straight from the camera that has not been worked on in any way, bring it into Photoshop.
Make a duplicate layer - hold down the Ctrl key and press J
Now go to the layers palette and click on the "create new fill or adjustment layer" button - it looks like a circle with two halves cut diagonally, one side black the other side white.
From the list that appears, click on "selective Color" (I nearly wrote "Colour"! But Photoshop is created in the USA so has American spellings)
My screen grab shows the button that is to be pressed (the location of the button depends on your version of Photoshop) and the list that appears. Selective Color is roughly in the middle of the list.
At the top of the box that will appear you will be able to select the colour you want to work on. For this particular tutorial, select the yellow.
Slide the Cyan slider to the right to increase the amount of blue to be mixed into the yellow.
Remember those days in school where you learned to mix colours using just the primary colours? Red and Yellow make Orange, Blue and Yellow make Green, Green and Red make brown. and so on. This is exactly what Photoshop needs to do, mix the primary colours in the right proportions to create the colour that you want.
By adding blue (Cyan) you are changing the yellow hues to green.
To darken that green add a little black.
Always move the sliders a little at a time and move them back and forth to find the results that please you and look NATURAL.
This is the difference I made to the picture I worked on.
The difference is subtle but the pine needles have been made a little greener.
I hope you have a try with this method of correcting your "yellows".
AJ


Friday, June 18, 2010

Elly


Here is a little snippet from a video I have just completed for a friend. I have extracted two little segments from it to show you what a vibrant person Elly is! We had a lot of fun making the video but when I came to put it all together the sound of her voice varies - it all depends on where in the room she stood - whether the sound bounced off one wall or two or whether it had no walls to reverberate from. Anyway. I hope you enjoy seeing it!
AJ

Sunday, June 13, 2010

Hooves and horses

Today, Sunday, Colin and I drove two and half hours west to a tiny dot on the map of Australia to a property called Jondaryan Woolshed. I had found out that there was to be a "Working Draught Horse Expo" to be held over the long weekend and my camera finger was decidedly itchy!
I was not disappointed. There were more horses and handlers at Jondaryan than there were spectators so I had a ball - I padded out into the ploughed field to take pictures of the pairs ploughing.
I talked to the owners of the horses and learned all about the training of the plough horses and was told all about horses that would work well together and young horses that have to be taught how to react to the reins. Everyone was just so willing to talk to me about their beloved hobby.
When we arrived we watched a horse breaker working with a young horse and later I found that same horse waiting with its young owner and again struck up a conversation and learned lots about the reasons why this horse had been chosen for the horse breaker to demonstrate his skills. This is a lovely looking horse and the young couple who own him were eager to tell me all about him and about the things they were learning from this weekend spent with other people with heavy horses.
I took quite a lot of photos and again if you would like to see them, click on this link
Click on Slideshow.
Press F11 so that the menu bars all disappear and when the first image comes up click on the PAUSE button. Progress through the photos using the arrow pad, allowing time for the photos to load.
When you are finished or have had enough (there are a lot of photos!) press "Esc" and also press F11 once more to bring back the menu bar.
AJ

Saturday, June 12, 2010

Cars, cars, cars

This week has been one of rock and roll and nostalgia for the 60's down on the border of New South Wales and Queensland where there has been the Wintersun Festival - the last of the Wintersun festivals up in this part of the country.
Colin and I crawled around the streets of Coolangatta for a good half hour in search of a place to park within reasonable walking distance - when we arrived in the main "drag" we could see why there were no parking places left - thousands upon thousands of people were there. Poor old Colin did not like it at all. He suffers from industrial deafness which means that when there is a lot of noise he cannot hear conversation - and noise there was in plenty. Rock and Roll bands were blasting out from the stages and when the parade passed by it was made up of several bands and all going their hardest. I loved it!
I have taken a few photos as well as a stretch of video (not included here) An if you would like to see more of the cars and the colourful people who managed to get in front of my camera, just follow the link to my Web Album.
You can view the images one by one or you can select Slideshow - but I recommend that in slideshow you immediately click the pause symbol. And use the arrow pad to progress through the pictures. Give them time to load!
http://picasaweb.google.com.au/joanren/WintersunCoolangatta?feat=directlink
The cars were glorious. I loved them all, they were shiny and bright and presented so well. I have no idea how many cars there would have been but easily five hundred. If I had taken a shot of each one I could publish a book! Trouble is that I have no idea what each car is until I look at the badge! They just look good!
AJ

Sunday, June 6, 2010

Mistaken identity

No picture today but a funny story.
I was out shopping and when I returned Colin told me that a white van had driven into the drive and a fellow hopped out.
"I've come to put the pinstripes on your boat" he announced.
"Pardon?"
"Your boat. I have come to put the stripes on it"
"But I don't have a boat"
Silence....
"Is this 4 Cardinal Court?"
"Yes"
"But I have to put the stripes on your boat"
"Sorry, you must have been given the wrong address, I can assure you, we do not have a boat and no one else in this court has a boat either."
He took some convincing but he did leave eventually. I wonder if he ever found the right address!
AJ

Saturday, June 5, 2010

Snakes alive!

There is always something interesting going on around here - but I don't always have the time to tell you about it!
I was called to the swimming pool to see "something interesting". Now you know that when the weather gets cooler the reptiles go into hibernation so what was waiting for me was a real surprise.
Swimming around in the blue waters of our pool was a snake!
1/125 f/5.4 42mm ISO 400
It would have been even colder in the water than in the sunshine but this little reptile was really showing off his skills. Up and down the side of the pool he went and when we walked near the edge where he was he would dive down and swim lower in the water. This was very much his environment.
We needed to get the snake out of the water but if we had used the leaf skimmer the snake would have wriggled over the edge and back into the water, so we coaxed it into the skimmer box.
The head and body went over the ledge but what the snake did not realise was that he left the last six inches of tail dangling in the pool. Colin lent over the edge and took a firm grip and easily lifted the little fellow out of the cold water.
1/400 f/8 26mm ISO 400
Before he was let free I persuaded Colin to hold the snake for me so that I could take a couple of photos of him.
1/320 f/8 14mm ISO 400
Standing up and holding the snake gives a better idea of the true length of the snake.
Of course I needed to get in close and get a better look. My final shot shows the markings on the snake. I have no idea what sort of snake it is or even if it is a poisonous snake.
1/600 f/5 36mm ISO 400
It was not a brown snake (deadly) or a red bellied black snake (deadly) Nor was it a tree snake - it was definitely not a carpet snake (python) so we gave the poor little fellow the benefit of the doubt and put him over the retainer wall into a big pile of leaves and branches and let him find someone else to alarm!
Once we are into winter and the night time temperatures are below 15 degrees it is unusual to see much action among the reptiles - especially the snakes. However I have noticed that with the warm daytime temperatures the little lizards are out in the open and running about.
I wonder what tomorrow will bring!
AJ