I was asked today if there was any way of printing out the tutorials from my blog.
One way is to highlight the tutorial - click and hold your mouse button down at the end of the tutorial and while still holding the button down drag the mouse up to the very top. Make sure that it is only the tutorial that is highlighted and not the list of blogs that are on the right hand side.
Release the mouse.
Click Ctrl+C (Control/Command plus the letter "C" on the keyboard) to copy to the clip board.
Open Word and a blank page or Open Office Writer and a blank page.
Click on the blank page to make it active (blinking line)
On the keyboard, now press Ctrl+V (control/Command plus the letter "V") to paste on to the page.
Save your new document and print it out when you are ready to use it.
I hope that helps!
AJ joanren@gmail.com
Tuesday, May 1, 2012


Monday, April 30, 2012
A fun effect
I have been playing with Photoscape once again - a delightful free program that can be downloaded by anyone. It offers so many options that even experienced photo manipulators can have fun with it - but it is so easy to use that even complete novices can manage fantastic results. I have a really boring photo that I didn't mind playing with, I found an old anchor laying in the grass many kilometers from the sea and no indication of where it might have come from. The grass has been neatly mown all around it so even if no one actually asks about it they can see it!
 First find your photo - finding the picture is just like using Windows Explorer. I keep all my photos in folders in one of my drives so I first select the drive, then the main folder followed by the sub folders until the pictures appear in the area below.
Click on the picture for it to appear in the main screen.
 Even though this photo is not dark, I added a little brightness to it.
 Most of the selections for adjustment are under the "Home" tab (bottom left of this screen grab). I clicked on Bright,Color (all the clicks have been highlighted with red), slid the cursor up to Brighten and clicked on the little arrow to make the pop-out box appear then selected the amount of brightness that suits the image. For me this was "Low"
With such a boring picture I felt that sepia would suit it. Here is what I did next.
 As you can see, the first two steps were the same as for "Brighten".
Even with sepia added the picture still did not look very special so one more effect was added.
 This time I have numbered the steps I took so that you can follow my path. I tried each of the seven variations before settling on number 4.
This is how the picture looks now.
 Now it has a bit of character!
The funny thing is I spend a lot of my time with old photos trying to make them look as though they have just been taken and here I am deliberately making a "today" photo look as though it has been to the dump and back!
Say I want to save this image. . .
I would like to email it so I will reduce the size so that it will not take too long to send
 Trial and error has shown me that by reducing the longest side to 700 pixels will give a photo a good size as an email attachment.
Click on "Save" down on the bottom right of the Photoscape page and then click on "Save as".
 You should ALWAYS keep your original photos. Any changes you make to that photo should be saved to a different location. Photoscape has even thought of that - if you chose to just hit "Save" the original photo will be saved as well!
You will be asked in the next pop up window about the quality you want to save the picture.
Pay more attention to the KB size than anything else. Slide the slider to make your changes.
 If the picture was straight from the camera the slider will be almost to the very left of the slide, my photo was not large to start with (I would confuse you by telling you why!) so the slider is almost midway and the quality over 80%.
Do have a play with Photoscape - there are lots of options to experiment with. If you want to know how to do something something specific, just drop me a line!
AJ joanren@gmail.com

Click on the picture for it to appear in the main screen.


With such a boring picture I felt that sepia would suit it. Here is what I did next.

Even with sepia added the picture still did not look very special so one more effect was added.

This is how the picture looks now.

The funny thing is I spend a lot of my time with old photos trying to make them look as though they have just been taken and here I am deliberately making a "today" photo look as though it has been to the dump and back!
Say I want to save this image. . .
I would like to email it so I will reduce the size so that it will not take too long to send

Click on "Save" down on the bottom right of the Photoscape page and then click on "Save as".

You will be asked in the next pop up window about the quality you want to save the picture.
Pay more attention to the KB size than anything else. Slide the slider to make your changes.

Do have a play with Photoscape - there are lots of options to experiment with. If you want to know how to do something something specific, just drop me a line!
AJ joanren@gmail.com
Thursday, April 26, 2012
Capturing a photo from the Computer Screen
Today I was asked how a picture could be saved from a power point show. To begin with my answer was to open the show in the Power Point program - but, came the reply, I only have Power Point Viewer. This changes things! However to save a Power Point picture is still quite easy to do.
I will show you how.
First of all, open Photoshop or Photoshop Elements - I am using Elements for this tutorial.
Now minimise the program so that you can access your folder containing the Power Point Show.
Find the image you would like to keep - use the arrow keys on your keyboard to forward to the picture you really like. Sometimes the images completely fill the screen and sometimes they are designed for 4:3 screens so they are more "square". The PPS I chose is like this.
Once you have found the picture you would like, press the "Print Screen" button on your keyboard.
 It is usually to the right of your "F" (Function) keys. Hold the key down for two seconds - a quick dab may not do anything.
Now close the PPS by right clicking with your mouse or touchpad and clicking "End show"
 Maximise Photoshop or PS Elements from the Task bar.
In the Menu Bar click on File>New>Blank file.
 Just left mouse click on OK to accept all the details without any changes.
Now go once again to the Menu Bar and this time click on Edit>Paste
 Your chosen image should now completely fill that blank file.
If you look across at the Layers Palette you will see that you now have a background and a layer.
 You will not be able to save the picture unless these are combined so the next step is to go to the Menu Bar and click on Layer>Flatten Image
 If your picture is - as mine is - smaller than the area it fills it will need to be cropped to remove the black border.
 Drag the crop tool from the top left hand corner of the picture down to the bottom right hand corner and "click the tick" or press the "Enter" key on your keyboard.
Now File>Save As and save your picture as a .jpg image - save it with a quality of 6. You really do not need a higher quality since this is most likely an image that was sent to you via email and is not a high quality image.
Always remember that these images are copyrighted so you can use them on your own computer but don't use them in a web page without asking the photographers permission and giving them credit for it.
AJ.
I will show you how.
First of all, open Photoshop or Photoshop Elements - I am using Elements for this tutorial.
Now minimise the program so that you can access your folder containing the Power Point Show.
Find the image you would like to keep - use the arrow keys on your keyboard to forward to the picture you really like. Sometimes the images completely fill the screen and sometimes they are designed for 4:3 screens so they are more "square". The PPS I chose is like this.
Once you have found the picture you would like, press the "Print Screen" button on your keyboard.

Now close the PPS by right clicking with your mouse or touchpad and clicking "End show"

In the Menu Bar click on File>New>Blank file.

Now go once again to the Menu Bar and this time click on Edit>Paste

If you look across at the Layers Palette you will see that you now have a background and a layer.


Now File>Save As and save your picture as a .jpg image - save it with a quality of 6. You really do not need a higher quality since this is most likely an image that was sent to you via email and is not a high quality image.
Always remember that these images are copyrighted so you can use them on your own computer but don't use them in a web page without asking the photographers permission and giving them credit for it.
AJ.
Wednesday, April 25, 2012
More on the Polarising effect
You may have found the polarizing effect to be rather too strong for your picture. Instead of enriching the sky it might have become far too blue.
One person contacted me after trying out the instructions and managed to work out how to make adjustments so that the effect was kinder. I will show you just how simple it is to do.
Look over at the Layers Palette on the right of your screen.
At the top, next to the Blending Mode - you changed the blending mode from Normal to Soft Light - is the Opacity slider. By reducing the opacity of your Soft Light Layer you will reduce the effect it has on the picture.
Changing the Opacity can be done in two ways
 The first way is to click on the down arrow beside 100% and grab the slider button with your mouse and drag it to the left.
Or
 Hover with your cursor under the word "Opacity", your cursor will change to a hand with a pointing finger with a left and right arrow on either side of the finger. Left mouse click and slide to the left while watching your picture. When you have the right amount of change, release the mouse button.
I hope that little "extra" helps!
AJ joanren@gmail.com
One person contacted me after trying out the instructions and managed to work out how to make adjustments so that the effect was kinder. I will show you just how simple it is to do.
Look over at the Layers Palette on the right of your screen.
At the top, next to the Blending Mode - you changed the blending mode from Normal to Soft Light - is the Opacity slider. By reducing the opacity of your Soft Light Layer you will reduce the effect it has on the picture.
Changing the Opacity can be done in two ways

Or

I hope that little "extra" helps!
AJ joanren@gmail.com
Monday, April 23, 2012
A simple polarizing effect
Just occasionally you may get a photo that looks very "washed out" the main part of the picture may look reasonable but the sky is lighter than you think it should be. This very simple fix may be your answer!
 Here I have a rather wishy washy photograph that will benefit from the technique I am about to show you.
First of all, open the picture in Photoshop Elements (this technique will work in Photoshop or Photoshop Elements) and use "Full Edit" from the selection on the right - not Quick Edit or Guided Edit. We will be working with LAYERS and this is not possible in Quick or Guided edit modes.
In the Layers palette on the right hand side, click on the "Create new layer" button.
 Can you see the word "Normal" written in a box above the layers?
Click on this box and it will drop down giving a long list of words.
Click on "Soft Light"
 The word "Normal" should now be replaced with the words "Soft Light".
You will see no changes to the picture yet but the "Soft light" blending mode will make a big difference to what we do next.
Now change the foreground colour to black (pressing the letter "D" on your keyboard will change the foreground and background colours to black and white)
 Click on the brush tool and make it large enough to paint the sky - and make sure that you have a soft brush.
 Now paint over your sky - I have deliberately painted over the little stone church so you can see more clearly what I have done.
 Use the eraser to remove the darkness that is created, from the areas where it is not wanted. I do not want it over the church so after erasing my painted layer looks like this.
 I did change my eraser to a hard edged brush so that it made a neater job of cleaning the sharp edges of the roof.
Once you are satisfied with the job you have done. go to Layers (on the menu bar) and click on "Flatten image" now the picture can be saved. Always save your altered photos with a new name, so always click on "Save As" not "Save".
I have put both pictures together so that you can see the effect of the painting with black and using Soft Light blending mode.
 The foreground also looks a lot brighter - but I must admit that I also went to Enhance>Auto smart fix (from the menu) and that clever little tweak balanced the light and shade.
The effect I have just described to you give a similar effect to putting a circular polarizer on your camera to deepen the blue of the sky and define the clouds.
I hope you give it a try.
AJ

First of all, open the picture in Photoshop Elements (this technique will work in Photoshop or Photoshop Elements) and use "Full Edit" from the selection on the right - not Quick Edit or Guided Edit. We will be working with LAYERS and this is not possible in Quick or Guided edit modes.
In the Layers palette on the right hand side, click on the "Create new layer" button.

Click on this box and it will drop down giving a long list of words.
Click on "Soft Light"

You will see no changes to the picture yet but the "Soft light" blending mode will make a big difference to what we do next.
Now change the foreground colour to black (pressing the letter "D" on your keyboard will change the foreground and background colours to black and white)


Once you are satisfied with the job you have done. go to Layers (on the menu bar) and click on "Flatten image" now the picture can be saved. Always save your altered photos with a new name, so always click on "Save As" not "Save".
I have put both pictures together so that you can see the effect of the painting with black and using Soft Light blending mode.

The effect I have just described to you give a similar effect to putting a circular polarizer on your camera to deepen the blue of the sky and define the clouds.
I hope you give it a try.
AJ
Sunday, April 22, 2012
Waking up
I find it so much more difficult contributing to this blogspot now that I am home - when I am out and exploring and discovering new things it is easy to put words together and find interesting photos to share! So I have decided that as well as share places and experiences I will also share methods of using programs that I have on my laptop.
I enjoy helping people understand how to use photo editing and video editing software and if I were to use this spot or even create a dedicated one for tutorials, it could be of some value. Often to see notes with illustrations brings back the verbal lesson and makes everything much clearer.
I have discovered that with the improvements that Google is making to their online sites (gmail, blogspot etc) the blogs that I have written up to two years ago are still accessible - but sometimes the photos are absent and there seems to be no logic in why one days photos have gone and why photos a day older should still be present.
As long as information is available- with the necessary illustration - months after it has been posted, this blogspot would be useful for struggling photoshop/ photoshop elements/ and premiere elements users.
I could also attempt to make videos of the screen which may be instructive too - but it is easier to have instructions that could be printed out so they can be followed.
So I have set myself a challenge!
There will be other stories interspersed with the tutorials - I love writing about my explorations and discoveries!
Maybe I will see you here one day soon?
AJ
I enjoy helping people understand how to use photo editing and video editing software and if I were to use this spot or even create a dedicated one for tutorials, it could be of some value. Often to see notes with illustrations brings back the verbal lesson and makes everything much clearer.
I have discovered that with the improvements that Google is making to their online sites (gmail, blogspot etc) the blogs that I have written up to two years ago are still accessible - but sometimes the photos are absent and there seems to be no logic in why one days photos have gone and why photos a day older should still be present.
As long as information is available- with the necessary illustration - months after it has been posted, this blogspot would be useful for struggling photoshop/ photoshop elements/ and premiere elements users.
I could also attempt to make videos of the screen which may be instructive too - but it is easier to have instructions that could be printed out so they can be followed.
So I have set myself a challenge!
There will be other stories interspersed with the tutorials - I love writing about my explorations and discoveries!
Maybe I will see you here one day soon?
AJ
Tuesday, April 10, 2012
On the water
It was such a beautiful day today that I loaded my camera into the car and headed off in the direction of "The Spit" which is a narrow neck of land stretching out into the Pacific Ocean and on which is located the Southport Yacht Club, the prawn fleet, Seaworld and a couple of very expensive hotels.
My main purpose was to take photographs of flags in different situation - this is one of the topics for this month for the Visions Group. Since there was a strong breeze blowing any flags I found were flipping around at a great rate of knots! I needed a very high shutter speed to get them!
I am not going to share the flags with you, instead I am going to show you a few shots I took while looking for them.
 Oops! A flag slipped in! The buildings in the background are Southport. Usually when high rise buildings are shown on the Gold Coast they are of the ones in Surfers Paradise. Southport is a suburb adjacent to and north of Surfers Paradise. Southport is considered to be the CBD of the Gold Coast while Surfers Paradise is the tourism hub. There are not as many tall buildings in Southport as there are in Surfers Paradise - but no doubt that will change over the years!
 Here is a different way to explore the Gold Coast. I have caught one of the Helitours just leaving from its floating pontoon with a well dressed passenger in the front seat. The tall building at the back is a shopping centre and office block. Three floors of the Australia Fair building are shopping centre and four are car parking. The Australia Fair (Scarborough Fair originally) was first opened in 1983 and is still a vibrant and popular place to shop.
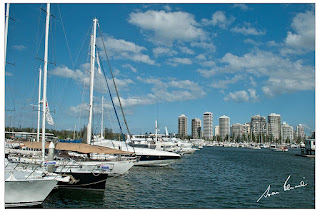 It was so pleasant rambling around the Marina along the Quay that I was often tempted to take photographs - on a sunny day like this the place looks magnificent! Of course, the large and luxurious water craft along this main walkway are on display to be sold. Several different marine brokers have strings of beautiful boats moored here.
 I would love to know more about this iron boat. It sits solidly on the water beside smaller bouncy, white luxury craft and has no pretence at beauty. What is the purpose of the projection at the front? I wonder. There was no one I could ask, just a couple of other people passing the time like me and they knew even less than I did!
AJ
My main purpose was to take photographs of flags in different situation - this is one of the topics for this month for the Visions Group. Since there was a strong breeze blowing any flags I found were flipping around at a great rate of knots! I needed a very high shutter speed to get them!
I am not going to share the flags with you, instead I am going to show you a few shots I took while looking for them.


AJ
Subscribe to:
Posts (Atom)