Showing posts with label Photoshop. Show all posts

Wednesday, January 16, 2013

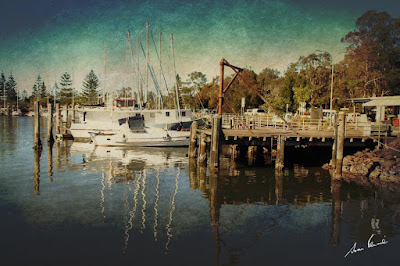
A hand written signature for your photos.


I was recently asked how to make a signature in Photoshop or Photoshop Elements (any version), I am sharing the instructions I gave. 
On a white piece of paper and using a reasonably thick ballpoint or gel pen, write your signature that you wish to use on your photos as your watermark.

Either use your camera to take a photograph of the signature or use a scanner.

Open the photograph or scan in Photoshop or Photoshop Elements.

Increase the contrast to make the white and black very definite and clean up any spots or marks.

Crop the image to leave hardly any space around the signature.

Resize so the largest side is 2000 pixels (doesn't matter what the resolution is)

Click on Edit then on Define brush

In the pop up window, give the brush a name.

 The brush has now been created and is ready to be used.

Open a picture.

Click on the brush tool and using the scroll besides the illustrations of the brush shapes, scroll right down to the very bottom.

To begin with your brush will be much too large so use the slider to change the size then, when hovering over the image to be signed, use the left square bracket key on the keyboard to reduce the size further.

Select the colour with which you are to sign your picture and click in an appropriate spot to imprint your signature.

 Be consistent about where you sign your images.

AJ

Monday, July 30, 2012

Stand up straight!

I deliberately took a photograph with my point and shoot camera of high rise buildings so I can show you how to correct the distortion that usually happens with the wide angle lenses these cameras have.
Here is my original photograph.
I have not bothered with any corrections at all, this is exactly as the picture came from the camera.
Because I am looking slightly upwards to include the top of the nearest building it has made all of the buildings look as if they are leaning away from me. When we look at buildings without the camera we are not aware of this being a problem but when you have an edge to a picture the distortion is really evident.
If you have either Photoshop or one of the versions of Photoshop Elements you will be able to follow my instructions on how to stand these building up straighter.
On the menu bar click on Filter and on Correct Camera Distortion (I am using Element 9 so the exact placement for Camera Distortion may be different for CS)
Make sure that the grid is visible because it really helps when trying to get the sides of the buildings straight. I noticed that when I made the right side of the large building line up with the grid that the base of the building was narrower than the top so I left a slight angle.
Further correction can be done using Free Transform
The buildings have been made a little squatter with the corrections that have been applied so they need a little more height given to them.
Take care that you do not apply too much height!
While the nodes of Free Transform are still around the picture put your left index finger on the Ctrl key on your keyboard and click the mouse onto one of the corners. By holding the Ctrl key you are able to move any one of the corners individually.

As you can see from the illustration above I moved the bottom left corner and the top right hand corner. As I moved each of those nodes I kept an eye on the main building to make sure my correction was not going to pull it over too much. It did need a little correction.
All that remains to be done is to flatten the image.
You may not have noticed but when the camera distortion correction was applied that the image became a "Layer" and that after that all corrections were being done to a layer. The image cannot be saved as a "jpg" until it is flattened. It must be flattened before you try to save it.
Here is my picture with before and after together.
You may be able to copy my first image and follow what I have done in your own Photoshop or Photoshop Elements program.
AJ


Wednesday, April 25, 2012

More on the Polarising effect

You may have found the polarizing effect to be rather too strong for your picture. Instead of enriching the sky it might have become far too blue.
One person contacted me after trying out the instructions and managed to work out how to make adjustments so that the effect was kinder. I will show you just how simple it is to do.
Look over at the Layers Palette on the right of your screen.
At the top, next to the Blending Mode - you changed the blending mode from Normal to Soft Light - is the Opacity slider. By reducing the opacity of your Soft Light Layer you will reduce the effect it has on the picture.
Changing the Opacity can be done in two ways
The first way is to click on the down arrow beside 100% and grab the slider button with your mouse and drag it to the left.
Or
Hover with your cursor under the word "Opacity", your cursor will change to a hand with a pointing finger with a left and right arrow on either side of the finger. Left mouse click and slide to the left while watching your picture. When you have the right amount of change, release the mouse button.
I hope that little "extra" helps!
AJ      joanren@gmail.com

Monday, April 23, 2012

A simple polarizing effect

Just occasionally you may get a photo that looks very "washed out" the main part of the picture may look reasonable but the sky is lighter than you think it should be. This very simple fix may be your answer!
 Here I have a rather wishy washy photograph that will benefit from the technique I am about to show you.
First of all, open the picture in Photoshop Elements (this technique will work in Photoshop or Photoshop Elements) and use "Full Edit" from the selection on the right - not Quick Edit or Guided Edit. We will be working with LAYERS and this is not possible in Quick or Guided edit modes.
In the Layers palette on the right hand side, click on the "Create new layer" button.
Can you see the word "Normal" written in a box above the layers?
Click on this box and it will drop down giving a long list of words.
Click on "Soft Light"
The word "Normal" should now be replaced with the words "Soft Light".
You will see no changes to the picture yet but the "Soft light" blending mode will make a big difference to what we do next.
Now change the foreground colour to black (pressing the letter "D" on your keyboard will change the foreground and background colours to black and white)
Click on the brush tool and make it large enough to paint the sky - and make sure that you have a soft brush.
Now paint over your sky - I have deliberately painted over the little stone church so you can see more clearly what I have done.
Use the eraser to remove the darkness that is created, from the areas where it is not wanted. I do not want it over the church so after erasing my painted layer looks like this.
I did change my eraser to a hard edged brush so that it made a neater job of cleaning the sharp edges of the roof.
Once you are satisfied with the job you have done. go to Layers (on the menu bar) and click on "Flatten image" now the picture can be saved. Always save your altered photos with a new name, so always click on "Save As" not "Save".
I have put both pictures together so that you can see the effect of the painting with black and using Soft Light blending mode.
The foreground also looks a lot brighter - but I must admit that I also went to Enhance>Auto smart fix (from the menu) and that clever little tweak balanced the light and shade.

The effect I have just described to you give a similar effect to putting a circular polarizer on your camera to deepen the blue of the sky and define the clouds.
I hope you give it a try.
AJ

Sunday, April 22, 2012

Waking up

I find it so much more difficult contributing to this blogspot now that I am home - when I am out and exploring and discovering new things it is easy to put words together and find interesting photos to share! So I have decided that as well as share places and experiences I will also share methods of using programs that I have on my laptop.
I enjoy helping people understand how to use photo editing and video editing software and if I were to use this spot or even create a dedicated one for tutorials, it could be of some value. Often to see notes with illustrations brings back the verbal lesson and makes everything much clearer.
I have discovered that with the improvements that Google is making to their online sites (gmail, blogspot etc) the blogs that I have written up to two years ago are still accessible - but sometimes the photos are absent and there seems to be no logic in  why one days photos have gone and why photos a day older should still be present.
As long as information is available- with the necessary illustration - months after it has been posted, this blogspot would be useful for struggling photoshop/ photoshop elements/ and premiere elements users.
I could also attempt to make videos of the screen which may be instructive too - but it is easier to have instructions that could be printed out so they can be followed.
So I have set myself a challenge!
There will be other stories interspersed with the tutorials - I love writing about my explorations and discoveries!
Maybe I will see you here one day soon?
AJ

Sunday, January 24, 2010

Using a texture over a picture

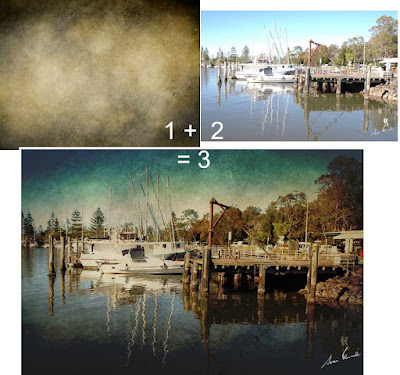
Just for fun and because it is Sunday and I have time to myself (wonderful) I downloaded a texture from one of the contributors at Flickr "skeletalmess" and had a bit of fun applying it to one of my uninspiring photographs to see how it would change it.

To combine two images it is important to first have them the same size.

With both the texture and the picture open in Photoshop I clicked on the texture to make it the selected image. Then I clicked on Image>Image size to bring up the resizing box. No alterations were done here, what I did next was to click on "Windows" in the menu bar and down at the bottom were listed the two images that were open in Photoshop. I clicked on the obscure name of the boats tied up at the wharf (letters and numbers assigned by the camera) and then clicked on OK in the Image Size box (which was still open).

The texture suddenly changed in size. It became very much bigger. In fact it became exactly the same dimensions and pixels per inch as the other picture.

Now I selected all (Ctrl +A) to select the texture and then copied it (Ctrl +C).

Clicked on the other picture and pasted the texture (Ctrl + V).

Of course, now I could see nothing except the texture. The image had been completely covered.

In the Layers palette I clicked on the blending modes ("Normal" is the default setting) and started to scroll through all the different blending options, pausing when I found one that I liked or found interesting.

Eventually I returned to Linear Burn and then reduced the opacity to 70%. Now this is what I finished up with.
Click here for a larger image. If ever there is a highlighted word in my text it will link to a larger picture.

After this experience I spent quite a bit of time downloading several textures to my HD for future play!

AJ

Saturday, January 23, 2010

A Koala uplift

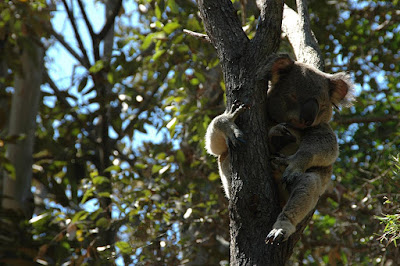
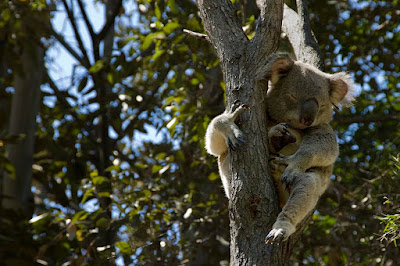
Looking through my photos to see what I had, I came across some delightful pictures of a sleeping koala. It isn't only the tourists who love these delightful and harmless Australian treasures, we locals can't get enough of them either!
But this shot needed a little work done to it to lift it out of the doldrums.
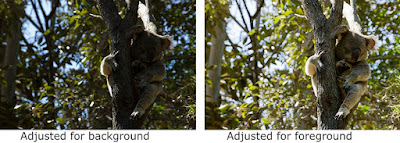
The photo was taken with the Nikon 70s and was in RAW format as well as jpg so I was able to open the picture twice in the Abobe RAW workplace. The first time I opened it I corrected the exposure for the background and the second time I increased the exposure, added some fill light and a little more black to correct the most important part of the photo, the koala in the fork of a tree.With both pictures open in Photoshop, I clicked on the image with the koala and its tree corrected. Then I roughly selected around the tree and occupant and Ctrl+C to copy the selection.
Then I clicked on the other image with the darker background and pasted (Ctrl + V) the koala selection onto it. Using the magnify tool I selected around the back foot of the koala to zoom right in to that part of the animal. Then the "V" key on the keyboard was tapped to make sure I did not have any selection or crop tool selected ("V" gives you the "Move" tool) and reduced the opacity to about 30% in the layers palette. Using the arrow keys on the keyboard I moved the koala layer until the hook on the toe was exactly over the one on the image below.Next I clicked on the Add Layer Mask in the layers palette, Chose a soft edged brush and painted away all the bright leaves from around the tree trunk and koala.
Once I was satisfied that there were no tell-tale bright bits to show that I had copied and pasted I "applied" the mask and then sharpened the koala and tree using "Smart Sharpen".
A blank new layer was added above the koala and selecting a shadow colour from the tree branch I painted over the very bright branch behind the koala's head to dull it down. I reduced the opacity and changed the blending mode to "darker color" and when I felt nothing more was needed the three layers were flattened.
and here is the final image.The camera may not lie but it doesn't necessarily see what our eyes see. Our eyes will compensate for the shadows while our cameras cannot without compromising the colour and shading of the surrounds - so with the tools that Photoshop has given us we can now produce what we know we saw!
AJ

Wednesday, January 6, 2010

Exaggerating a light display with Photoshop


When I wrote about the fireworks I told you that it was possible to combine two shots to make a more dramatic one. When the background is black and the fireworks are bright - white and coloured - it is easy to combine two shots.
Make sure both images are the same size to start with (makes life so much easier!) The "Select all" on one of the pictures and paste it on top of the other.
In the Layers palette change the blending mode from "Normal" to "Screen" and the black background of the top layer magically disappears and allows the image below to show through. The top image can be resized and moved to create a better balanced picture.
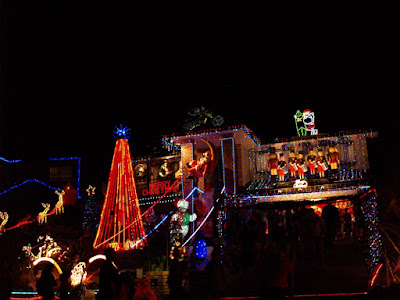
So that this technique can be seen more clearly I will use two images that are quite different from each other - one is of a home that has been decorated with lights for Christmas.

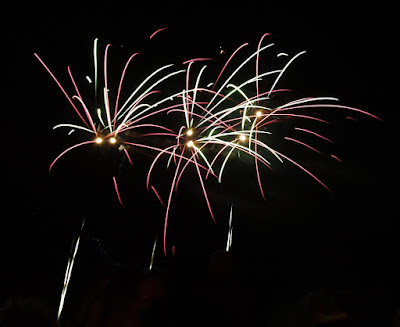
The second shot is of a burst of fireworks.

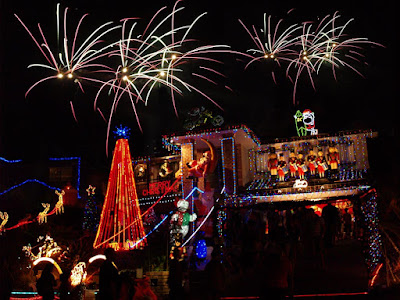
By copying and pasting the fireworks picture onto the decorated home picture I can make a very special display - one the home owner didn't plan!

"But", you say, "There are more firework bursts in this combination shot than in the original."
Well spotted!
Once I had pasted the fireworks onto the decorated home picture and changed the blending mode to Screen I then copied and pasted this layer and selecting the second layer I clicked Ctr + T to select Free Transform and holding down the Shift key I resized the layer so that the firework bursts were smaller - and, of course, I moved this layer over to the right so that the sky became filled with firework lights.

I hope that you are able to follow how I combined two or more shots to make a realistic new picture.
AJ

Saturday, October 31, 2009

A different way of sharpening your images

I sometimes cringe when I see how photos have been sharpened. It is just so easy to overdo a good thing! Most images, no, all images benefit from a little sharpening. Sharpening is the very last thing that is to be done after working on any colour correction or even major manipulation such as cloning. Photoshop has all sorts of ways in which you can sharpen your images but I am going to show you with pictures one of the lesser used methods that actually does an amazing job. Another great thing is that it is so easy to do.
First make a duplicate layer of the picture by holding the Ctrl key down and hitting the letter J.
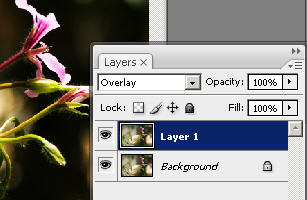
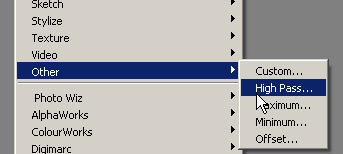
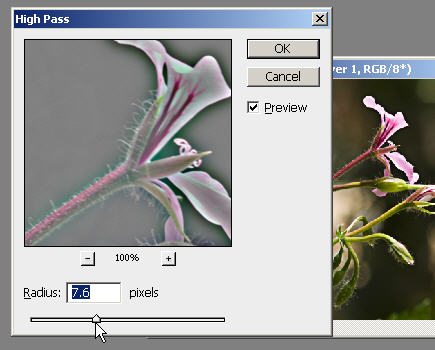
In the Layers Palette change the blending mode (top left) to Overlay. The results look absolutely horrific, but don't panic yet!From the menu (along the top of the screen) select FILTER scroll down to the bottom of the mail list and hover over OTHER and click on High Pass.In the preview window your image looks rather like embossed pewter. Move the slider around to see what happens. For my image I chose a number a little over 9 pixels. If the Preview radio button has a tick in it you will see the actual results on your mail image.
Click OKIn the layers palette click the eye beside the layer off and on so that you can see the before and after results. When you feel that this is what you really want, flatten the image.
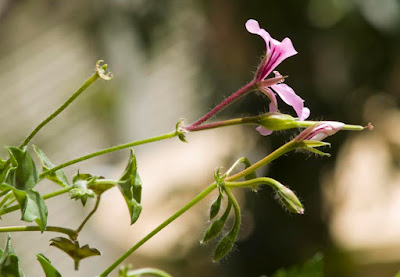
The reason I like this method of sharpening is because you do not get the halo effect that happens with the Smart Sharpen or the other Sharpen methods. Take a look at this detail of the same picture done two ways.The one on the left was done using High Pass and the background is smooth as well as there being no dark halos around the pink petals. In the image on the right you might be able to see the dark line all around the petal and curly stamens - the centre enlargement is from the image on the right. In that you can clearly see the "noisy" background and the dark edge all around the bit of flower. For me that is all I need to see to encourage me to use the High Pass method of sharpening.
AJ

Sunday, October 18, 2009

Another lighting effect

Once more I have been playing around in lighting effects, this time with "spotlight". Of course, with any effect it is possible to go "over the top" and get really bizarre effects but I am so conservative that I aim for the natural look!
We had a shower of rain this afternoon and I raced out to get a few shots of rain dampened flowers. A few spots of water on the petals always gives a great look! Rain does it so much better than a mist gun!
Anyway, with one of the shots - a rather gorgeous day lily - I thought I would have a play with the spotlight effect. The settings I used are shown above - I hope they are large enough that you can see the numbers I used? You can easily see how I pulled the ellipse about so that the bright effect was where I wanted it to be. If the ellipse is too narrow or too small the effect is much harsher.
I also clicked into the white colour picker squares and changed the colour to a light yellow to echo the colour of the flower. Stronger colours have a different effect so I recommend that you have a play!
Now take a look at the subtle difference I made to my picture. Maybe you feel it is too subtle? However every picture is created to the likes of the person in control of it - I work on my pictures so that I like them. Its a bonus if YOU like them too!

Tuesday, October 13, 2009

Another Photoshop effect to try

I thought it was about time I taught myself how to use a new filter in Photoshop. So after working quickly on a couple of pictures (after all this was just an experiment!) I duplicated the image and with the duplicate applied a lighting effect. You can see from the screen grab the settings I picked. The effect was rather good so I have included a couple of before and after shots to show how it looks when used.
To get to the lighting effects go to Filter>Render>Lighting Effects and have a play! When the omni lighting effect is used - this is the one I particularly liked - it seems to have the effect of brightening in the area of the circle - which can be resized and moved too - and darkening the surrounds. Well the darkening is created by moving the "ambience" slider. This darkening is loosely like adding a vignette to the image.

Thursday, September 24, 2009

Toowoomba colour


I was looking through the photographs I took when touring some of the lovely gardens in Toowoomba on Tuesday and picked on this one to share with you. It was taken in the Botanical Gardens - I thought the name of the garden was Queens Park but our coach driver called it the Botanical Gardens. Whatever! As my son would say!
Anyway, the shot, taken from knee height to give the tulips pride of place in the fore-ground, is enhanced slightly in Photoshop to give that cerise colour even more impact.
At the bottom of the Layers Palette in Photoshop is a round button that is cut in half diagonally and one half of the circle is black the other white.
Click on this button and a list of options is given. I clicked on "Selective Color".
At the top of the box that now opens it is possible to choose any individual colour and modify it.
I selected Green first and moved the black slider to the right a llile. This made the leaves of the tulips darker.
Next Yellow was selected and again the black slider was moved to the right a little and this took the brightness off the pale coloured lawn.
The layer was flattened and the beautiful tulips really stand out so much better even though the changes were only modest.
Sometimes a little change makes all the difference.
AJ