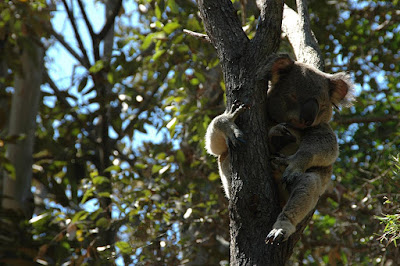
 Looking through my photos to see what I had, I came across some delightful pictures of a sleeping koala. It isn't only the tourists who love these delightful and harmless Australian treasures, we locals can't get enough of them either!
But this shot needed a little work done to it to lift it out of the doldrums.
The photo was taken with the Nikon 70s and was in RAW format as well as jpg so I was able to open the picture twice in the Abobe RAW workplace. The first time I opened it I corrected the exposure for the background and the second time I increased the exposure, added some fill light and a little more black to correct the most important part of the photo, the koala in the fork of a tree.
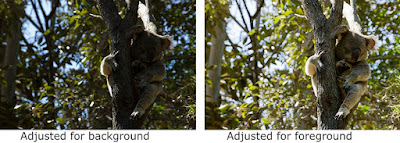 With both pictures open in Photoshop, I clicked on the image with the koala and its tree corrected. Then I roughly selected around the tree and occupant and Ctrl+C to copy the selection.
Then I clicked on the other image with the darker background and pasted (Ctrl + V) the koala selection onto it. Using the magnify tool I selected around the back foot of the koala to zoom right in to that part of the animal. Then the "V" key on the keyboard was tapped to make sure I did not have any selection or crop tool selected ("V" gives you the "Move" tool) and reduced the opacity to about 30% in the layers palette. Using the arrow keys on the keyboard I moved the koala layer until the hook on the toe was exactly over the one on the image below.Next I clicked on the Add Layer Mask in the layers palette, Chose a soft edged brush and painted away all the bright leaves from around the tree trunk and koala.
Once I was satisfied that there were no tell-tale bright bits to show that I had copied and pasted I "applied" the mask and then sharpened the koala and tree using "Smart Sharpen".
A blank new layer was added above the koala and selecting a shadow colour from the tree branch I painted over the very bright branch behind the koala's head to dull it down. I reduced the opacity and changed the blending mode to "darker color" and when I felt nothing more was needed the three layers were flattened.
and here is the final image.
 The camera may not lie but it doesn't necessarily see what our eyes see. Our eyes will compensate for the shadows while our cameras cannot without compromising the colour and shading of the surrounds - so with the tools that Photoshop has given us we can now produce what we know we saw!
AJ
No comments:
Post a Comment