Showing posts with label Technique. Show all posts

Tuesday, December 18, 2012

Back to sharing and teaching

At long last I have returned to my blogspot to write and share some of my pictures and experiences with anyone who cares to take a look. For the past month I have been posting pictures on a daily basis to Google+ which is an open networking/social media site. Although I take photographs of many different things I chose to share birds and landscapes. All well and good - the Google+ interface allowed the photographs to be viewed in good quality and I was uploading mine at 2000 pixels on the largest side so they did look good in spite of the 72 dpi resolution! However I have chosen to stop this daily dabble and return to my blog page - because I like to write. Reactions in Google+ are two words long, usually and there are no questions or reactions to anything that is written so VERY frustrating.
I know, there are no questions or reactions to anything written in these pages either - but at least I can enjoy the presentation myself - and look back on earlier postings and share the stories with my email friends. I do hear about my postings via email and that way I can interact about the topic that was covered or give additional information to anyone who has not quite understood a tutorial.
I will now try and add something to these pages each day. It may be long it could be very short, it may be about something done ages ago or it may be a travel diary as I explore the world. This is my page and I will be as inconsistent as I am in real life!
Barking owl - Ninox connivens
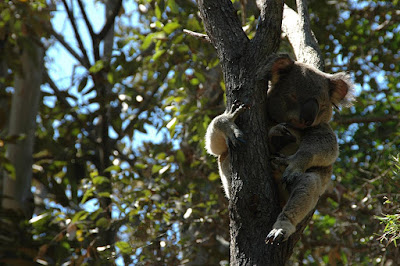
One thing I will attempt to avoid is personal stuff! Breathe easy! You will not see much of the family here - but you may glimpse my husband occasionally since he always accompanies me on my trips. He sometimes gets in the way of the camera!!!
On a recent visit to Currumbin Sanctuary on the Gold Coast of Australia, I took along my Nikon D90 and had the sense to take the 55-300mm lens along as well as the standard 18-50mm, so I was able to use the full zoom (300mm) to isolate the birds from their backgrounds. You can tell from the patterning in the background to the Barking Owl that this is a captive bird - what you cannot tell is that heavy mesh was between the camera lens and the bird. The spaces between the wires was about 3cms so it was not possible to thread the lens through the gaps - also there was a no-go space between the cage and the footpath. That is why manual focus had to be used, if I had used automatic focus this would be a photograph of the wire with a dark shape behind it. Deliberately focusing on the birds made the near wires evaporate and the narrow depth of field I had chosen made sure that the wires in the background were not so visible either.
If you are using a compact camera that has a good zoom on it, you too would be able to do this - but you will need to check in your camera manual on how to manipulate the focus. If you are using a tripod (highly recommended for this sort of shot) you will have time to tweak the focus. A bird, such as an owl, keeps quite still for a long period of time. You just have to wait for the eyes to open!
AJ

Monday, July 30, 2012

Stand up straight!

I deliberately took a photograph with my point and shoot camera of high rise buildings so I can show you how to correct the distortion that usually happens with the wide angle lenses these cameras have.
Here is my original photograph.
I have not bothered with any corrections at all, this is exactly as the picture came from the camera.
Because I am looking slightly upwards to include the top of the nearest building it has made all of the buildings look as if they are leaning away from me. When we look at buildings without the camera we are not aware of this being a problem but when you have an edge to a picture the distortion is really evident.
If you have either Photoshop or one of the versions of Photoshop Elements you will be able to follow my instructions on how to stand these building up straighter.
On the menu bar click on Filter and on Correct Camera Distortion (I am using Element 9 so the exact placement for Camera Distortion may be different for CS)
Make sure that the grid is visible because it really helps when trying to get the sides of the buildings straight. I noticed that when I made the right side of the large building line up with the grid that the base of the building was narrower than the top so I left a slight angle.
Further correction can be done using Free Transform
The buildings have been made a little squatter with the corrections that have been applied so they need a little more height given to them.
Take care that you do not apply too much height!
While the nodes of Free Transform are still around the picture put your left index finger on the Ctrl key on your keyboard and click the mouse onto one of the corners. By holding the Ctrl key you are able to move any one of the corners individually.

As you can see from the illustration above I moved the bottom left corner and the top right hand corner. As I moved each of those nodes I kept an eye on the main building to make sure my correction was not going to pull it over too much. It did need a little correction.
All that remains to be done is to flatten the image.
You may not have noticed but when the camera distortion correction was applied that the image became a "Layer" and that after that all corrections were being done to a layer. The image cannot be saved as a "jpg" until it is flattened. It must be flattened before you try to save it.
Here is my picture with before and after together.
You may be able to copy my first image and follow what I have done in your own Photoshop or Photoshop Elements program.
AJ


Tuesday, June 21, 2011

Water - splash or smooth?

Water is a magnet when you have a camera in your hands - or I should say "it is a magnet for me!" I am not the greatest fan of water that has been photographed in such a way that it looks like something other than water. I have seen crashing seas taken with a slow shutter speed that has successfully taken the anger out of the water and rendered it into a solid seething mass of slime. To me that is unthinkable! The sea has so many moods but it is never "slimy"!
In spite of my dislike of that "look" I still cannot resist the challenge of slowing down the shutter speed and adjusting the aperture when I see fast flowing water. Just last week I took this shot.
f/ 36    0.3 sec  ISO 200     55mm  (17-55mm lens)
The water was in a little park and I had to lean over a fence to be able to take the shot. To my mind this is a shot that gives force to the water, the shutter speed has not been slow enough to smooth the water completely, there is enough splash left to give character to the water - so that it still looks like water! In the background the water running over stones has been smoothed to look more like material but that is due to the depth of field. The softer focus combined with the slow shutter has removed any splash.
By contrast I took a photograph of a pelican racing into the sea with its trophy on a fast shutter speed because I wanted the bird to be in focus and the agitated water to show the urgency of the dash.


f/ 6.3   1/320sec  ISO 200     55mm  (17-55mm lens)

Photography is all about decisions! Deciding on what is the subject, deciding on how to capture that subject to show a particular emotion or feature, deciding on whether to use shutter priority or aperture priority and so on and so on! Everyone wants something different from their images so although I may criticise what someone else has done with a photograph (I try not to!) it is more than likely that that "someone else" captured exactly what they set out to capture! I can only tell you the reasons I have taken a photo in a particular way.
AJ

Tuesday, June 22, 2010

Next step with Selective Color

Continuing on from yesterday's tutorial on using Selective Color - I would like to show you how to determine just what is affected by the colour change.
We shall take the same photo we used yesterday but this time I am going to change the sky. The lower left of the picture is really over exposed and white and I would like this to be changed to blue.
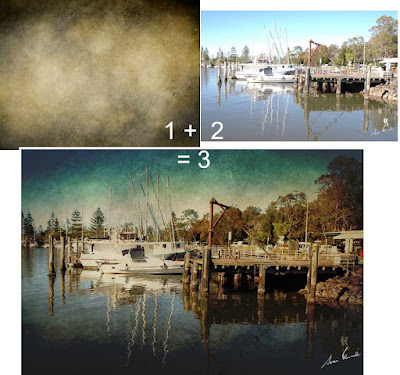
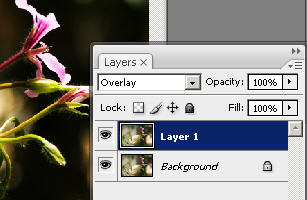
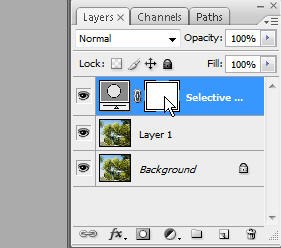
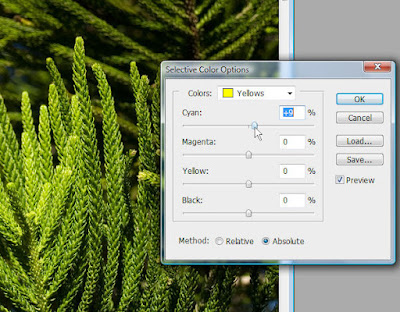
To begin with, duplicate the layer and click on the round button that is half black, half white. Select white as the colour to be changed and slide the colour sliders and the black slider to change the white to match the blue at the top of the picture.
You will notice in the layers palette that there is a white box beside the Selective Color symbol. This is a "reveal all" mask.
Click on the white box.
Now select a soft edged brush and with black as the foreground colour paint away the blue that is in the wrong places - in my picture the white of the branches and tips of the leaves has also been changed to blue. 
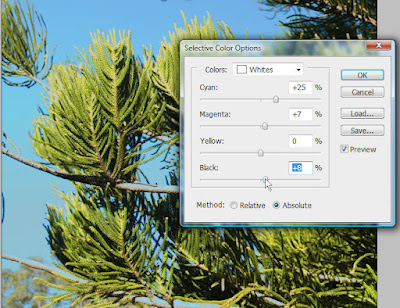
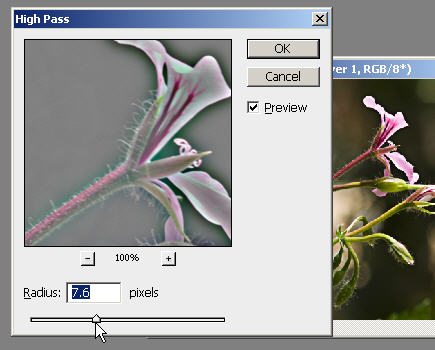
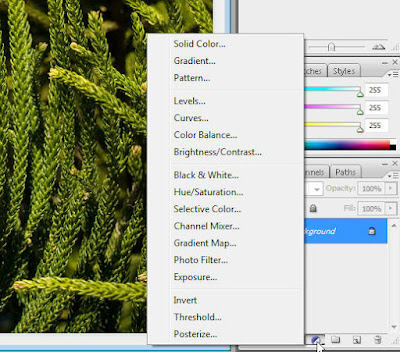
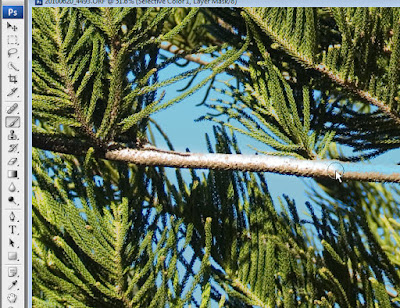
You will need to use the magnifier to get in very close so that you can be accurate in your brushwork. Zoom in and take care as you paint - it required a very small brush to remove blue from the tips of the green leaves and I would not even have seen that it needed doing until I zoomed in.
Zoom out and enlarge the brush and paint over the upper part of the sky and tree where the original colour was stronger. You can see on the tiny image of the mask where the brush has been worked (on the picture above).
Here are the before and after pictures.
The left hand picture has the white in the sky and the one on the right has more colour. Too much colour would be artificial, so try not to be heavy handed!
AJ

Sunday, June 20, 2010

A Photoshop tip

I had some fun with my camera today and once back on the computer continued to have fun - playing around with Photoshop. There is one little tweak that I would like to pass on to you. It is a really useful and natural looking manipulation to the colour in your photos.
The subject I used was very simple - a branch of a Norfolk Island Pine tree.
What colour would you say the "leaves" were? Did you say green?
When it comes to working with colour in Photoshop you may be surprised to learn that actually most things you see that are green are actually YELLOW. Grass is yellow and so are most of the leaves on the trees - and they contain a varying amount of cyan and magenta and black.
That all sounds very muddling, doesn't it! Look back at that picture of the Norfolk Island Pine, can you now see yellow?
If you have a photo of trees or a grassy paddock, straight from the camera that has not been worked on in any way, bring it into Photoshop.
Make a duplicate layer - hold down the Ctrl key and press J
Now go to the layers palette and click on the "create new fill or adjustment layer" button - it looks like a circle with two halves cut diagonally, one side black the other side white.
From the list that appears, click on "selective Color" (I nearly wrote "Colour"! But Photoshop is created in the USA so has American spellings)
My screen grab shows the button that is to be pressed (the location of the button depends on your version of Photoshop) and the list that appears. Selective Color is roughly in the middle of the list.
At the top of the box that will appear you will be able to select the colour you want to work on. For this particular tutorial, select the yellow.
Slide the Cyan slider to the right to increase the amount of blue to be mixed into the yellow.
Remember those days in school where you learned to mix colours using just the primary colours? Red and Yellow make Orange, Blue and Yellow make Green, Green and Red make brown. and so on. This is exactly what Photoshop needs to do, mix the primary colours in the right proportions to create the colour that you want.
By adding blue (Cyan) you are changing the yellow hues to green.
To darken that green add a little black.
Always move the sliders a little at a time and move them back and forth to find the results that please you and look NATURAL.
This is the difference I made to the picture I worked on.
The difference is subtle but the pine needles have been made a little greener.
I hope you have a try with this method of correcting your "yellows".
AJ


Monday, May 3, 2010

Converting from RAW to Jpeg with ACR

Whenever I step out of the house I have a camera with me, usually it is a tiny point and shoot - you never can tell when a photo opportunity will rear its head and if the camera is safely at home, tucked up in a padded camera bag that shot is lost and forever forgotten. I much prefer to take my photos with my Olympus SLR but it has to be left home occasionally!

Having enjoyed a few opportunities especially designed so that I can indulge my photo taking enthusiasm,lately, I have plenty of pictures to choose from when I feel like sharing!
Today I have been reliving the latest holiday in New Zealand as I convert each shot taken in RAW format on the SLR, correcting any exposure problems and brightening the dark shadows to reveal hidden details. So far I have only reached day two so there are only 1500 files to go. (Just guessing!) With ten days shooting with an average of 100 shots per day there are still a lot of pictures to look at! I have read of pro shooters who shoot masses and only keep three, I am afraid I have more keepers than I have rubbish! The digital format was invented for people like me!
But I am not sharing any NZ pictures with you today. I spend time in this great land of ours (Australia) and never tire of the wonders I find in the bush. So many of the plants are small and insignificant but when you stop and look closer they are stunning in their complexity. I have no idea of the plant name for this little hard leafed fern I found near the sea shore. It must be salt tolerant and able to withstand all kinds of weather. The texture of the plant tells me that. But look at the little twirls on the edges of the leaves, They are exquisite!

f 5.6 1/160 ISO 200
If you wish to see this picture larger, click on it and you will be taken to a larger version which will also enlarge when the magnifier is selected.

My second plant picture is of grass seed heads. Growing in the open, some grasses have evolved to have their seeds spread by the wind. These seedheads are ripe and ready to expel their load of seeds and they catch the sunlight and look soft and tactile. Actually I cannot resist holding out my hand and letting the grasses brush over my palm.

F8.0 1/400 ISO 200
And finally one of the dramatic and very large plants that inhabit our rainforests. These plants are ferns and are epiphytic, drawing their nutrients from the air. They are found high in the trees or low on the ground - where ever the spore has taken a hold. Of course they are also a very popular garden plant and make a dramatic statement, growing equally as large as they would if left in the bush.
F6.3 1/40 ISO 100
They are given the common name "Crows nest fern" because of the way they grow into a circle of leaves surrounding the growing heart. This particular fern caught my camera's attention because of the way a shaft of sunlight caught it. Thanks to the way a RAW file can be manipulated I have been able to reveal the very dark plants that surround it without compromising the brightly lit area.
Photoshop has a special sub program called "Adobe Camera Raw" or ACR which I use when converting my SLR photos. I only use a few of the controls available because I only want to bring out the best of what I have rather than recreate the photograph completely! However it is something I couldn't live without!
AJ

Thursday, February 4, 2010

Using a shareware program on photos

I love experimenting with new programs - I downloaded a shareware program called FotoSketcher and had a play with it. This is the idea of "Shareware" you can try before you buy. There are so many presets that do an amazing job of a photo it seems silly to move any of the sliders to create more - but of course I did! I am first showing the original picture - the one I selected at random to test the program. I actually do not know what I would do with any one of these effects but I must agree that it was fun creating the following pictures!
I have never really wanted to create a watercolor or an oil painting effect from one of my photos but this little program can do that quite effortlessly - and you can select the texture of the material the "painting" has been created on! Those effects I did not show - or this mail would be as long as your arm!
Here are just some of the different variations that FotoSketcher can give.
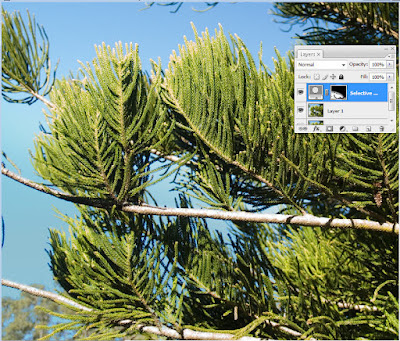
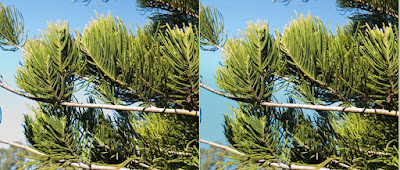
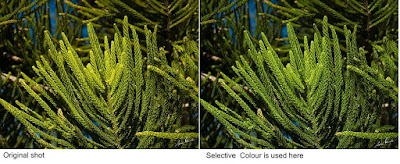
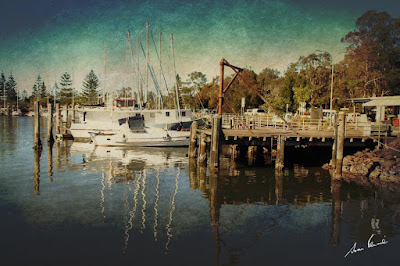
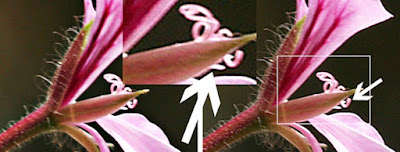
As you can see the variation each have their own appeal. Do a "Google search" for Fotosketcher if you are interested in having a go! The programmer is in the USA and it is not an expensive purchase if you want to keep it.
AJ


Sunday, January 24, 2010

Using a texture over a picture

Just for fun and because it is Sunday and I have time to myself (wonderful) I downloaded a texture from one of the contributors at Flickr "skeletalmess" and had a bit of fun applying it to one of my uninspiring photographs to see how it would change it.

To combine two images it is important to first have them the same size.

With both the texture and the picture open in Photoshop I clicked on the texture to make it the selected image. Then I clicked on Image>Image size to bring up the resizing box. No alterations were done here, what I did next was to click on "Windows" in the menu bar and down at the bottom were listed the two images that were open in Photoshop. I clicked on the obscure name of the boats tied up at the wharf (letters and numbers assigned by the camera) and then clicked on OK in the Image Size box (which was still open).

The texture suddenly changed in size. It became very much bigger. In fact it became exactly the same dimensions and pixels per inch as the other picture.

Now I selected all (Ctrl +A) to select the texture and then copied it (Ctrl +C).

Clicked on the other picture and pasted the texture (Ctrl + V).

Of course, now I could see nothing except the texture. The image had been completely covered.

In the Layers palette I clicked on the blending modes ("Normal" is the default setting) and started to scroll through all the different blending options, pausing when I found one that I liked or found interesting.

Eventually I returned to Linear Burn and then reduced the opacity to 70%. Now this is what I finished up with.
Click here for a larger image. If ever there is a highlighted word in my text it will link to a larger picture.

After this experience I spent quite a bit of time downloading several textures to my HD for future play!

AJ

Saturday, January 23, 2010

A Koala uplift

Looking through my photos to see what I had, I came across some delightful pictures of a sleeping koala. It isn't only the tourists who love these delightful and harmless Australian treasures, we locals can't get enough of them either!
But this shot needed a little work done to it to lift it out of the doldrums.
The photo was taken with the Nikon 70s and was in RAW format as well as jpg so I was able to open the picture twice in the Abobe RAW workplace. The first time I opened it I corrected the exposure for the background and the second time I increased the exposure, added some fill light and a little more black to correct the most important part of the photo, the koala in the fork of a tree.With both pictures open in Photoshop, I clicked on the image with the koala and its tree corrected. Then I roughly selected around the tree and occupant and Ctrl+C to copy the selection.
Then I clicked on the other image with the darker background and pasted (Ctrl + V) the koala selection onto it. Using the magnify tool I selected around the back foot of the koala to zoom right in to that part of the animal. Then the "V" key on the keyboard was tapped to make sure I did not have any selection or crop tool selected ("V" gives you the "Move" tool) and reduced the opacity to about 30% in the layers palette. Using the arrow keys on the keyboard I moved the koala layer until the hook on the toe was exactly over the one on the image below.Next I clicked on the Add Layer Mask in the layers palette, Chose a soft edged brush and painted away all the bright leaves from around the tree trunk and koala.
Once I was satisfied that there were no tell-tale bright bits to show that I had copied and pasted I "applied" the mask and then sharpened the koala and tree using "Smart Sharpen".
A blank new layer was added above the koala and selecting a shadow colour from the tree branch I painted over the very bright branch behind the koala's head to dull it down. I reduced the opacity and changed the blending mode to "darker color" and when I felt nothing more was needed the three layers were flattened.
and here is the final image.The camera may not lie but it doesn't necessarily see what our eyes see. Our eyes will compensate for the shadows while our cameras cannot without compromising the colour and shading of the surrounds - so with the tools that Photoshop has given us we can now produce what we know we saw!
AJ

Saturday, October 31, 2009

A different way of sharpening your images

I sometimes cringe when I see how photos have been sharpened. It is just so easy to overdo a good thing! Most images, no, all images benefit from a little sharpening. Sharpening is the very last thing that is to be done after working on any colour correction or even major manipulation such as cloning. Photoshop has all sorts of ways in which you can sharpen your images but I am going to show you with pictures one of the lesser used methods that actually does an amazing job. Another great thing is that it is so easy to do.
First make a duplicate layer of the picture by holding the Ctrl key down and hitting the letter J.
In the Layers Palette change the blending mode (top left) to Overlay. The results look absolutely horrific, but don't panic yet!From the menu (along the top of the screen) select FILTER scroll down to the bottom of the mail list and hover over OTHER and click on High Pass.In the preview window your image looks rather like embossed pewter. Move the slider around to see what happens. For my image I chose a number a little over 9 pixels. If the Preview radio button has a tick in it you will see the actual results on your mail image.
Click OKIn the layers palette click the eye beside the layer off and on so that you can see the before and after results. When you feel that this is what you really want, flatten the image.
The reason I like this method of sharpening is because you do not get the halo effect that happens with the Smart Sharpen or the other Sharpen methods. Take a look at this detail of the same picture done two ways.The one on the left was done using High Pass and the background is smooth as well as there being no dark halos around the pink petals. In the image on the right you might be able to see the dark line all around the petal and curly stamens - the centre enlargement is from the image on the right. In that you can clearly see the "noisy" background and the dark edge all around the bit of flower. For me that is all I need to see to encourage me to use the High Pass method of sharpening.
AJ