Showing posts with label Photoshop technique. Show all posts

Wednesday, February 5, 2014

Creating a lens effect with Photoshop Elements

I was recently asked how to make a small part of a picture in sharp focus when the rest was blurred. Since this effect might come in useful for you to, I thought I would share my method. (There are many different ways of achieving the same thing).
Firstly I found  a clipart image of a magnifying glass and after removing it from its background (using the Magic Wand tool) It was pasted onto the picture I had chosen. The magnifying glass has been moved to cover three birds.
This is how things look in the Layers Palette.
Now I want to select those birds so that they will fit into the magnifying glass. In the Layers Palette I clicked on the eye to the left of the magnifying glass. Doing this makes the layer "invisible" so that you can see what is below.
I then left mouse clicked on the background to make it the "active" layer.
I chose the Eliptical Marquee tool from the tool bar - it may first be seen as a Rectangular Marquee, it is a "multi" button so you have a choice of eliptical or rectangular.
I held down the SHIFT key on the keyboard to enable me to make a circular selection of the birds.
The circle was not in quite the right place so I had to place the cursor INSIDE the circle and move it to where I wanted it. Do not try to grab the edge of the selection or you will create a new selection.
Ctrl +J copied the circle selection and pasted it above the background.
This is how things look in the Layers Pallet now. Notice the "crossed out eye" in the layer that contains the magnifying glass.
I then clicked on the eye to make that layer (glass) visible again and clicked and held the left mouse button down as I dragged Layer 1 so that it was between Layer 2 and Background. The mouse button released when a dark line appeared between layer 2 and Background.
The picture now looks like this (only part of the picture is shown)
The picture does not look very inspiring just yet but we are only half way there!
The next thing I did was select (using the Rectangular Marquee tool ) most of the picture but leaving an even sized border all the way around. Ctrl + J copied and pasted that layer above the Background.
This layer is to be blurred so from the Menu Bar I selected Filter>Blur>Gaussian Blur.
I watched the main picture rather than the preview window as I slide the selection button to the right until I had the amount of blur that I felt was adequate. I needed enough contrast with the sharp image of the birds but not too much that the picture looked really false.
I used the Rectangular Marquee tool again to draw around the blurred layer and went to Edit >Stroke (Outline) Selection to put a white line around that layer. (If I tried to apply a Stroke without using the Selection tool, the stroke was blurred too.
Next the bird layer was selected (click that layer in the Layers Palette) and re-sized to fit inside the round shape of the magnifying lens (Ctrl +T gives the Transform tool) To create a more natural look I went to Layer>Layer Style>Style Setting>Glow.
This makes the glass look as if it is convex (slightly rounded)
And here is the final image.
If you are observant you will notice that the handle of the magnifying glass is in a different position, I rotated it a little before I flattened the image! The "Transform" handles on that layer are still showing!
AJ


Saturday, November 3, 2012

How to use a very useful filter

I have recently downloaded a free filter from http://yaelmaritz.com/extras.php that I thought might be handy when I have photographs with horribly blown out white skies. Today I have had a chance to play with that filter and since the picture I chose was far too complex for my usual methods of replacing skies I thought I might share the steps I took. You may find them useful when you come to try this yourself. (I work with Photoshop Elements 9)
Here is the picture I worked with. As you can see, the sky is filled with white clouds which were very bright. The camera had been set to brighten the bird and so made the background even more dazzling. This meant that the photo has stayed in my collection and as never been shown to anyone.
With all those twigs and leaves you can understand how difficult it may be to replace the background so lets see what my new "Kill white" filter will do.
First of all I created a duplicate layer (Ctrl + J).
Since there is white in the bird and in the twigs that are in focus I needed to make sure the filter did not remove any white from them. So I selected them. To do this I chose the Quick Selection Tool and made sure that the tool was set to add to the selection.
Now I stroked along the bird and the thin branches and the leaves making sure that I was including all the elements that I did not want to have any white removed. The soft focus and minor twiggy bits I did not save. Then I clicked on the "subtract from the selection button (to the right of the one the red arrow is pointing to) and removed from selecting the bits of sky between the bird and the twig that had been included. I had to zoom in tight to see what I was doing. Because the selection had taken time to refine I didn't want to lose it so I clicked on Select (Menu bar) and then on "Save Selection" and gave a name as requested by the drop down box. "bird"
After doing that I realised that I needed to have a blue sky to replace the white that I was going to remove. It was just as well the selection had been saved because now I have to "deselect" !
After clicking on the "eye" on the left of the layer to make it invisible, I clicked on the background layer in the Layers Palette and then added a blank layer by clicking on the "create a new layer" button (hover over the buttons and text will appear).
With a light shade of sky blue and a very light shade of the same colour I then used the gradient tool to create the sky - drag from about a third of the way down from the top right down to the bottom of the picture area with the darker colour to be at the top. If it is lighter at the top than the bottom just Ctrl +Z to undo what you have done and change the background and foreground colours by clicking on the tiny two way arrow, then drag down the image again.
Click on the empty box to replace the "eye" (the visibility) for the layer. The bird picture now hides the sky layer. Now to use that new filter! First of all I needed to put my selection around the bird and branches so I clicked on "Select" then on "Load Selection" and said "OK" to the bird selection. I I now applied the filter it would affect inside that selection - that was not what I wanted! Click on Select and then on "Inverse" to change the selection to the sky area.
This is what happened next.
How amazing is that? But there is a problem. There are a few little bits that were missed. The red arrows point to two of them. Time for another little technique.
Now I needed to create a mask and paint away those white bits.
When a mask is put onto a layer the background and foreground colours in the tools palette change to black and white. The black needs to be the forground colour. Use the little two way arrows to change it if white is the foreground colour. I had to zoom in very tight to see what I was doing and with a small soft edged brush painted away those white bits.
The results are worth it.
The picture needs to be flattened before it can be saved as a .jpg.
You can flatten in a few ways, right click in the layers palette and click Flatten Image or click on the symbol indicated in the image above and then click on Flatten Image OR go to the menu bar and click on Layer then on Flatten Image.
If I put the before and after images side by side you can see the difference.

Do you think you could improve one of your images the same way? I suggest you download the Killwhite filter, follow the instructions that come with it to install it in your program and see if you can follow my steps. If you have photos of skies (I have many!) one could be resized and used in place of the gradient layer.
If you have problems, drop me a line joanren@gmail.com
Have fun!
AJ


Wednesday, May 9, 2012

Download a brush set

Just occasionally you may feel like having something a little different to play with in the form of brushes - or you may want to download a ready made collection of cloud brushes instead of creating brushes from your own photos of clouds. Whatever the reason I will help you to understand how uncomplicated it is to get and install them.
First find the brushes.
I simply type into the Google Search "Photoshop brushes" and you would be amazed how many links appear - and most of them offer free downloads (the brushes AND the download are free). If you need a specific shape - such as clouds, then put that into the search too "Photoshop cloud brushes" and that will find the specific brush sets that you can visit. Each of the creators of brushes let you see what they have before you download them - there are usually a few examples shown.
I have just searched for "smoke" to find brushes to put steam on a cup of coffee or add smoke to a shot of a smoldering log. That is a brush I would not be able to make myself. I found my smoke here but I am sure there would be lots of excellent sites I could have gone to.
 I could add just a little steam for a "not too hot" look....
 Or I could give lots of steam - it depends on how much I erase from the single dab with the steam brush.
Lets concentrate on Clouds, since that is what I have been showing up until now. This is a good site to go and chose some. There are dozens of other sites just as good. Click on the link below the set you would like to download.
The file is in a Zip folder and will go into the download folder you have put aside for all things you save from the computer. Do set a special folder so that you know where to find your downloads! In your browser go to Options then to Tools and (each browser is different) somewhere you will find an option similar to this.
I realise that most people put everything in "My Documents"  (now called "Libraries"!)but I go straight to one of my three drives and create my folders there. You do what you feel comfortable with - but deciding on your location means you will always know where to go looking for your downloaded pictures, programs, music, etc.
Back to our clouds - click on the Download button or link to get the brush folder.
The name of the brush folder will be shown on the pop up download box - this is important because just sometimes there are other things that can be downloaded on the same page and they are not what you want. (They pay to be on that page, they are a form of advertising). Click Save File for your cloud set.
If you feel like getting a few different brushes before you close your browser, go for it! I found some flames and some swirly brushes for borders! Now close the browser and open your Windows Explorer and find the folder where your zip files have been saved.
Right click on the folder (can you see that the folder has a zip?!)
In the pop up box that appears click Browse and find the download folder (the same folder that the zip is in) and click Extract.
Another folder will be alongside the zip folder, left click on it to reveal what is inside.

If, like me, you have quite a few things in your download folder already it might be clearer to make a new folder and drag the zip folder into it. If this is confusing information, ignore it!
When you click on the unzipped folder the brush is an ABR file or else it looks like in my illustration above, it depends on whether you have chosen to view as Thumbnails or as Details.
Right click on the brush or the ABR file and Copy - do this by holding down the Ctrl and letter C at the same time.
Now you have to put the file into Photoshop or Photoshop Elements.
Follow the route I have taken - it is the same for either program.

Now all you need to do is open your program and use the brushes.
Always put a new layer over your image before using the brush, that way the cloud can be moved or it can be made larger. If you paint a cloud and have used the largest brush size and it is still not large enough, use the keyboard and Ctrl+T to bring up "Transform" Then you can drag the corners out to enlarge your cloud or even distort it by squeezing in the sides and stretching the top or bottom.
Apply another layer if you want to add a different shaped cloud. You can add as many layers as you like and as many clouds as look natural.
Once you have finished and everything looks good, Flatten the image and save it.
Have fun with your brushes!
AJ




Friday, May 4, 2012

Changing skies

Australia (and other countries!) can have the most beautiful blue cloudless skies. I love those days! Mind you, sometimes the photos taken on those days would be so much better if there were a few clouds to add interest to that emptiness!
For those occasions when I find a photo that the eye is pulled into the blank emptiness at the top, I have made my own clouds!
Perhaps I am doing this tutorial the wrong way around - I am going to show how to use the cloud without showing how to MAKE the clouds! I will do that next time.
First I have a picture taken in the Northern Territory.
This is a very important landscape to the aboriginal people of this area. The eye is drawn right through the picture into the blue of the sky. A couple of clouds would stop that happening and allow the eyes to linger longer over the landscape - can you see the face on the rock profile? See, you looked right past it!
Make a blank layer to go over the picture.
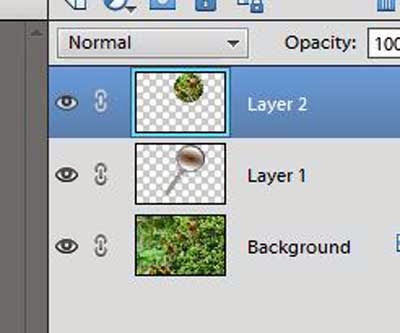
If I show you this often enough, you may be able to remember! The grey and white squares in the layer that is called "Layer 1" indicate that it has no colour in it at all, it is transparent.
Imagine a piece of clear cellophane laying over the page of a book, that is how this layer is, you can see through it and all below is unchanged by it in any way.
We shall "paint" clouds onto this layer - and you do not need to be an artist to be able to do this. It is really straight forward.
Before getting to this stage I would suggest that you search for and install a set of "Cloud brushes".
The instructions on how to install the brush set in Photoshop or Photoshop Elements are given to you by the brush designers. Not only have I downloaded a couple of different sets of cloud brushes I have also made my own and this is what I will show you how to do in my next tutorial.
The next thing to do for adding clouds to a sky is to click on the brush tool.
After clicking on the tool, click on the brush set at the top - if you haven't changed your brushes recently it will read "Default brushes". From the drop down box, select the set of brushes that contain the clouds. I have three different sets of cloud brushes but I have selected the set I created myself.

Click on the picture with your brush (you are on the layer so you cannot spoil anything).
When I clicked on my photo I discovered that the brush was much too big for my needs so I had to reduce its size. To do that I held down the Ctrl key (Command for Mac users) and dabbed repeatedly on the left square bracket key, next to the letter "P". The brush I had left sitting over the picture and by using both hands on the keyboard I could watch to see the cloud shape reduce in size until it looked as if it was small enough for me to use. When the cloud brush is hovering over the picture there is a rough outline of the shape.
I had left a big imprint on the layer when I first clicked with the brush.
Delete that layer and create a new one. Delete the layer by clicking on the garbage bin at the bottom of the layers palette and then clicking "Yes" when asked if you really want to delete the layer. Click on the Add new layer button again (like in picture number 2) so you have a clean layer for your new cloud size.
Before applying the brush we need to set the colour for the clouds. White and black would work but take a good look at clouds - they are not pure white. They would be really dazzling if that were so.  Click on the foreground colour of the two colour swatches at the bottom of the tool bar and in the colour selection box that appears chose a yellow colour - slide a little further down towards the red so there is a warmth to the yellow. You will need a sample from the light area. Here is where I took my sample.
The background colour swatch can be black or dark grey - it gives the shadows to the cloud.
Now click only once on the sky - after using the outline as a guide to positioning the cloud.
Although the cloud is dabbed at 100 per cent opacity this strength can be reduced in the layers palette to more transparent. It looks quite natural, doesn't it?
Because this cloud is on a layer it can be moved. Change the tool to the Move tool (hit the letter V on your keyboard, if you like short cuts!) and move the cloud across the sky.
Take care that the cloud is not put over the top of trees or buildings. If that happens you will need to erase using either the erase tool or by using a mask and painting out the cloud.
When you are happy with the placement of your cloud go to Layers>Flatten image (on the Menu Bar).
Now, off you go and find a set of cloud brushes and give a little character to those empty blue skies!
AJ                joanren@gmail.com

Wednesday, May 4, 2011

A short note about the Macro shots

What I failed to mention in my blog yesterday about the photos included was that all the photos were "as taken'. There was no Photoshop tweaking or cropping - except for that very last shot of the ants in the centre of the flower.
Normally EVERY shot I take is modified in some way. The levels are adjusted, there might be a slight colour adjustment and there is always a touch of sharpening.
However I thought it would be better for comparison if there was no adjustment at all to the shots taken by two cameras using different lenses.
AJ

Tuesday, February 8, 2011

New lens from Ebay seller

I have just received what I consider to be a "gift". I am an Ebay addict! I have to make an effort to stay away from Ebay because I find it so much fun bidding and winning or purchasing something I feel I cannot do without. I have bought all sorts of things, a hose for the swimming pool cleaner unit, bags for the vacuum cleaner, food saver storage bags - and all sorts of electronic and photographic gadgets!
My latest purchase was a last minute decision to bid on a wide angle lens that had only 13 minutes to go before the bidding was closed. I can't remember what limit I set for my bid but I know I was surprised that it was accepted and that I was the "winning bidder" For the princely sum of $27.50 (Aust) I actually became the proud owner of this.
My new lens is .45mm macro/wide angle that screws onto my 18-55mm Nikon lens.
I haven't really tried any close up photography other than play with the wrapping that was around the parcel so I will show what it is capable of another day. But I did try a couple of wide angle shots - the reason I wanted this was so that I could get more people in a shot or take more of a room when the camera was used indoors.
This was my first attempt at indoor wide with this lens. You will see some huge barrel distortion but I will then show you how that can be corrected.

To be honest I was blown away with just how much I was able to get in my shot. There is a black vignette which means that the lens behind (the 18-55mm) is seeing the outer rim of the lens. I shall have to be aware of that and not push the lens that wide.
In Photoshop this barrel distortion is corrected in Filter>Distort>Lens Correction and this is how much I corrected the barrelling.
The filter allows the image to be re-scaled to remove the distorted edges - but that is stretching the picture. I prefer to accept the correction and then crop the image. To be left with this . . .
 If I had taken this same angle of my home with the 18-55mm lens I would only have got half the bookshelf - to this side of the two white backed Encyclopedia in the middle shelf - and all the opening through to the dining room.
So I am going to have some fun with this extension!
AJ

Monday, January 31, 2011

Photo layering

I have been playing yet again! I was busy recording tutorials for a workshop to be held on Wednesday when I managed to get distracted! Every day I enjoy reading the posts from DPS and sometimes becoming "inspired" to try one of the suggestions. The simple tutorials I had been recording led me from one topic to another and thanks to that Photography site, I started to think of textures and layering.
I am not sure if my "pupils" would appreciate this sort of manipulation so I am sharing it with anyone who visits my blog instead!
I started out with a blank canvas and using one of the bog-standard weird Photoshop brushes that I had never used before - it looks a bit like a dirty smudge - I made the brush huge and with two dabs created an interesting "background". Then I "colorised" it in Hue and Saturation and then textured it with a very large and deep canvas texture from filters. I created a soft vignette using the Lens Correction filter and came up with this.
Having a texture meant I needed a photo! I dug one out of my collection, it was a rather pleasant, quiet photo of an Australian pelican on the edge of the water. The texture was overlayed and all sorts of blending modes and opacities were tried. When I settled on one combination I liked I then used a mask to clean the texture from the bird.
So far so good - but not really as inspiring as I thought it could have been. What about some text?
Googled "Australian Pelican" and on a scrap of paper wrote down what was written on the site I opened.
I played around with the colour of the text and placed it over the image making it cover the entire picture. This time I used the Multiply opacity.
 Once again I erased the layer from the bird and this is what I ended up with.

I quite enjoyed experimenting but I am not sure if this example is dramatic enough. I shall have another go with a different texture and photo and see what I can come up with!
AJ

Sunday, July 11, 2010

Using a texture to give mood

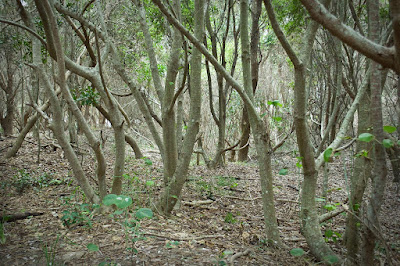
I walked through between a stand of trees to reach a lighthouse today. The trees looked mysterious and foreboding and I thought I would try and capture that dark mood. When I brought the image in to Photoshop it looked interesting but still not as atmospheric as when I aimed the camera at it. The photo is just a photo of a few trees. Yes, you can see that it is dark enough under the trees for no grass or small plants to grow but there is very little about the picture that holds the attention. I added a small amount of vignette to the edges and corners which helped keep the eye inside the picture but still it did nothing for me!
Click to see a larger picture
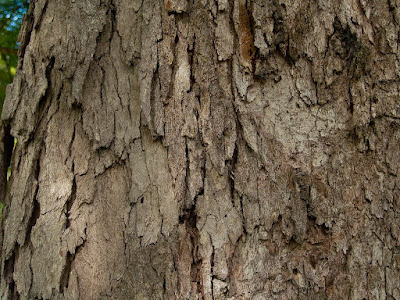
That's when I decided to have a play with one of the texture images I have taken. I selected a shot of the bark of a gnarled and woody Eucalypt that is growing my my own backyard. The vertical patterning would suit the upright nature of my trees, I felt.
I have not used textures to any extent so this was an experiment to see what would happen.
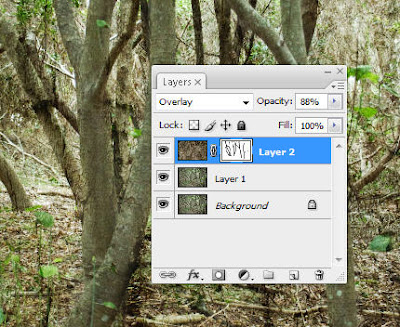
The texture was pasted over the worked picture of the trees and I scrolled through the various blending modes to see what blend worked the best. Up and down through the different blends I went two or three times and the one that suited this picture the best was Overlay. At full strength it was rather too heavy so I reduced the opacity a bit.
Then I felt that the tree trunks were lost in all the pattern and what would they look like if I revealed them a bit more? I applied a mask and used a soft brush at 70% to paint over the major trunks and branches.
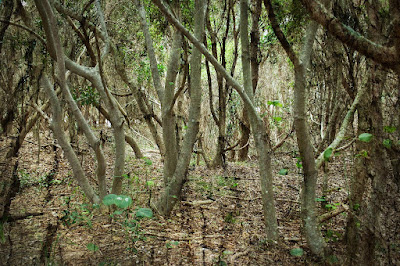
Liking this effect I did no more! It is a temptation to keep on doing more and more to a picture! So the layers were flattened and this is the end result.
Click to see a larger picture
Now this image has loads of mood! Much better than the original shot!
AJ

Sunday, July 4, 2010

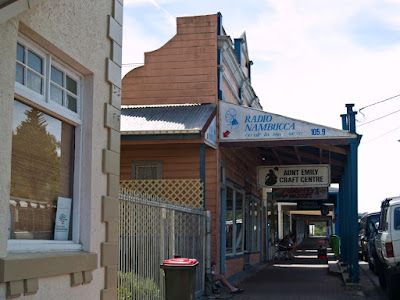
An addition to the Selective Color tutorial

When I wrote advising on how to change the colour of various parts of your images by using Selective Color I didn't give you the full instructions but a few people have had a try and have run into a few problems - the color is in places where it is not needed. How do you get rid of that?
Again I will demonstrate with the changing of the colour of the sky and show you the extra steps that I take. I must rush in here to remind you that there are many different ways of doing any task in Photoshop and I am not telling you the only way, just my way.
For this tutorial I am making no tweaks or sharpening at all. I do not wish to confuse by giving too many tutorials in one mail!
Step 1. Do any corrections such as cropping, transforming (correcting badly aligned verticals)and straightening the horizon etc.
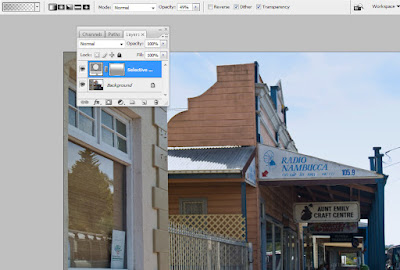
Step 2. Click on the round symbol half black, half white that gives you the drop-down box for Selective Color.
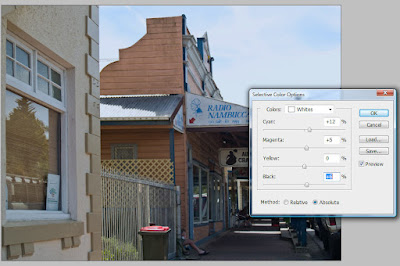
Step 3. Chose the colour you wish to change - for this sky I selected white - and move the sliders to give the hue and shade you feel is best. Click OK.
Step 4. Click on the white square besides the image in the Layers Palette and from the tools panel click on the gradient tool. Change the opacity (at the top of the screen) to about 55%.
Step 5. Click in the gradient box (top left of the screen) and make sure that the gradient pattern is foreground (black) to transparent and a straight gradient - not a circular gradient or any other shape!
Step 6. On the picture drag the gradient from blow the horizon up to about halfway into the sky. The idea is to have a slightly lighter horizon - if the light and dark areas have an obvious line where they change, undo and make the drag over a larger area. Start a bit lower and finish a bit higher in the picture.
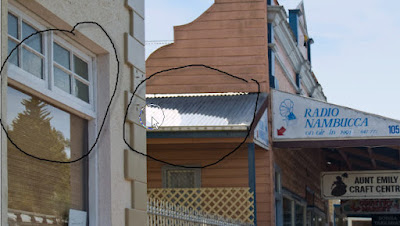
Step 7. This is a definite improvement but the highlights on the lean-to roof have also been turned blue, as have the window frames of the window on the left. From the tools palette chose the brush tool and select a hard edge. With the Opacity set to 100% paint over the buildings and foreground features (white cars) that might have been tinted.
You can see where I have painted with the brush tool and black onto the mask in the circled areas. It does not hurt to increase the brush size and paint over the entire area that is not sky.
Step 8. Flatten the image and save with a new name.
Here is a composite picture to show the before and after of this Selective Color change.
Once I have changed one colour I sometimes flatten the image and then do a Selective Color change on something else - such as greens that look rather yellow (Selecting Yellow as the colour to change) - again I will use the brush tool to paint out the yellow items that I do not wish to colour change - such as clothing, signs, vehicles and so on.
Flatten the image once the colour change has been done and then (and only after all other tweaks have been done) apply Sharpening.
AJ

Tuesday, June 22, 2010

Next step with Selective Color

Continuing on from yesterday's tutorial on using Selective Color - I would like to show you how to determine just what is affected by the colour change.
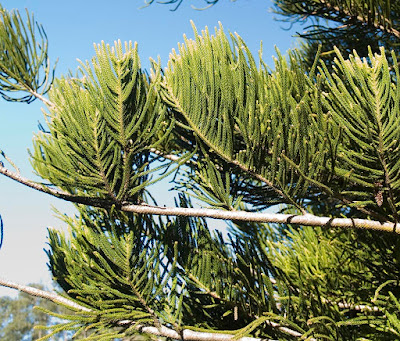
We shall take the same photo we used yesterday but this time I am going to change the sky. The lower left of the picture is really over exposed and white and I would like this to be changed to blue.
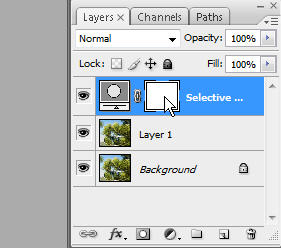
To begin with, duplicate the layer and click on the round button that is half black, half white. Select white as the colour to be changed and slide the colour sliders and the black slider to change the white to match the blue at the top of the picture.
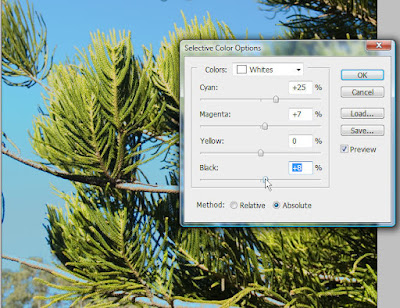
You will notice in the layers palette that there is a white box beside the Selective Color symbol. This is a "reveal all" mask.
Click on the white box.
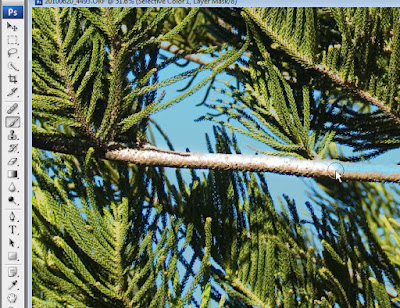
Now select a soft edged brush and with black as the foreground colour paint away the blue that is in the wrong places - in my picture the white of the branches and tips of the leaves has also been changed to blue. You will need to use the magnifier to get in very close so that you can be accurate in your brushwork. Zoom in and take care as you paint - it required a very small brush to remove blue from the tips of the green leaves and I would not even have seen that it needed doing until I zoomed in.
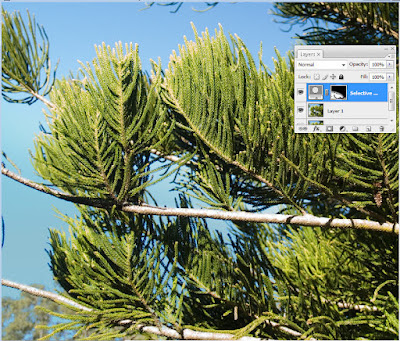
Zoom out and enlarge the brush and paint over the upper part of the sky and tree where the original colour was stronger. You can see on the tiny image of the mask where the brush has been worked (on the picture above).
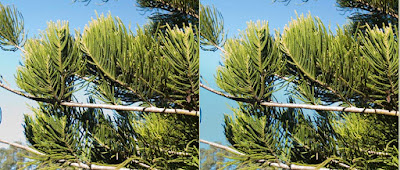
Here are the before and after pictures.
The left hand picture has the white in the sky and the one on the right has more colour. Too much colour would be artificial, so try not to be heavy handed!
AJ