Showing posts with label Photoshop elements. Show all posts

Sunday, February 9, 2014

A simple and fun technique for Photoshop Elements

While playing with my photos today I taught myself how to remove a large empty space from a photo. My picture had items in the foreground then a large area that was empty before there was more in the distance. Closing up the empty space makes a great difference. Here is how it is done.
My picture started out looking like this
From the menu bar, click on Image>Recompose.
Nothing appears to have happened - but at the bottom of the screen there are two new controls
By default, when you touch the picture you will find you have a brush that allows you to paint over the parts of the photo that you do not want to damage. If there are people in the picture, be sure to touch each and every one or they could end up distorted! This is how I touched the parts I wanted to keep safe.
Now you need to click on the lower brush - the one with the minus sign beside it - to show which part or parts of the image you do not mind losing.
Once again I used a freehand line to mark the width of sand I wanted to remove.
I then clicked outside of the picture and this gave me the crop bounding box - you can see the nodes on the image above,
I then left mouse clicked on the centre bottom node and pushed the node upwards.
At the bottom of the image appeared the usual two symbols that you chose to accept the change or cancel. I selected the "check" symbol. When the bottom of the picture was pushed upwards the areas that were covered with green did not alter their shape at all. I did notice that the blank area of sky at the top was compressed even though I had not indicated one way or the other what I wanted to happen there.
The picture now has a transparent space that needs to be removed. So the next action is to use the regular crop tool.
When the crop boundary is exactly where you want it, left mouse click  the "Check" mark.
If you glance across at the Layers Palette you will notice that the image is now a layer. This means that it needs to be "Flattened" before it can be saved as a "jpg".
To flatten an image either go to the Menu bar and click on Layer>Flatten Image or in the Layers palette right click on the layer and left click on Flatten Image .
This technique can be used vertically as well as horizontally and the results are quite amazing! You have to try it!
AJ


Wednesday, February 5, 2014

Creating a lens effect with Photoshop Elements

I was recently asked how to make a small part of a picture in sharp focus when the rest was blurred. Since this effect might come in useful for you to, I thought I would share my method. (There are many different ways of achieving the same thing).
Firstly I found  a clipart image of a magnifying glass and after removing it from its background (using the Magic Wand tool) It was pasted onto the picture I had chosen. The magnifying glass has been moved to cover three birds.
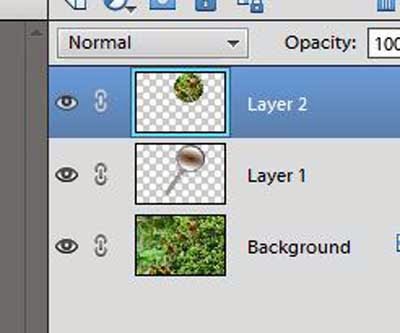
This is how things look in the Layers Palette.
Now I want to select those birds so that they will fit into the magnifying glass. In the Layers Palette I clicked on the eye to the left of the magnifying glass. Doing this makes the layer "invisible" so that you can see what is below.
I then left mouse clicked on the background to make it the "active" layer.
I chose the Eliptical Marquee tool from the tool bar - it may first be seen as a Rectangular Marquee, it is a "multi" button so you have a choice of eliptical or rectangular.
I held down the SHIFT key on the keyboard to enable me to make a circular selection of the birds.
The circle was not in quite the right place so I had to place the cursor INSIDE the circle and move it to where I wanted it. Do not try to grab the edge of the selection or you will create a new selection.
Ctrl +J copied the circle selection and pasted it above the background.
This is how things look in the Layers Pallet now. Notice the "crossed out eye" in the layer that contains the magnifying glass.
I then clicked on the eye to make that layer (glass) visible again and clicked and held the left mouse button down as I dragged Layer 1 so that it was between Layer 2 and Background. The mouse button released when a dark line appeared between layer 2 and Background.
The picture now looks like this (only part of the picture is shown)
The picture does not look very inspiring just yet but we are only half way there!
The next thing I did was select (using the Rectangular Marquee tool ) most of the picture but leaving an even sized border all the way around. Ctrl + J copied and pasted that layer above the Background.
This layer is to be blurred so from the Menu Bar I selected Filter>Blur>Gaussian Blur.
I watched the main picture rather than the preview window as I slide the selection button to the right until I had the amount of blur that I felt was adequate. I needed enough contrast with the sharp image of the birds but not too much that the picture looked really false.
I used the Rectangular Marquee tool again to draw around the blurred layer and went to Edit >Stroke (Outline) Selection to put a white line around that layer. (If I tried to apply a Stroke without using the Selection tool, the stroke was blurred too.
Next the bird layer was selected (click that layer in the Layers Palette) and re-sized to fit inside the round shape of the magnifying lens (Ctrl +T gives the Transform tool) To create a more natural look I went to Layer>Layer Style>Style Setting>Glow.
This makes the glass look as if it is convex (slightly rounded)
And here is the final image.
If you are observant you will notice that the handle of the magnifying glass is in a different position, I rotated it a little before I flattened the image! The "Transform" handles on that layer are still showing!
AJ


Friday, January 18, 2013

Laughter in the air

Yesterday when walking with my dogs, one of them pounced on a baby lorikeet that had crash landed on the ground. (I rescued it and took it to a wildlife hospital where it is doing well - no injuries!) So I should not have been surprised when, on hearing the tell-tale sound of a Kookaburra throatily telling the other birds to leave him alone from his perch on a tree root that my faithful black retriever dashed to my rescue in the frantic hope that this time he would be allowed to keep his catch. However I had staggered out there with tripod, camera and long lens so was not exactly pleased with his helpfulness!
The Kookaburra was not an injured bird so it was able to fly up into a branch of the fire-wheel tree - Samson was hot on his heels so before I could even call the dog to leave it alone, the bird had flown! Kookaburras are actually a bird that will allow you to get quite close to them, usually. I followed my feathered quarry into a fenced area - being sure to close the gate with Samson on the other side! Unfortunately  now the bird was quite sure that I wanted to catch it and only very briefly did it sit in range of the camera. Luckily for me that one photograph turned out quite reasonable - except that it was a tad dark.
With the darkness corrected.
Since many people do take photographs with the main subject either silhouetted or a bit darker than liked, I will show you what I did to end up with this picture so that you too can fool everyone into thinking you take wonderful shots every time!
To begin with I used the quick selection tool in Photoshop Elements and dragged it over the branch and the bird.
You can see from the red arrows how I dragged the tool down and across the bird and the branch, Some of the background was selected too but I then held down the ALT key and with the same tool slowly and carefully dragged over those areas to de-select them.
Now I needed to brighten the bird and branch (You can now see that they do look a bit dull and need a "lift")
I then opened Levels (Ctrl + L) and moved the mid tones and the highlights sliders. The mid tones (centre slider) was moved the most.
The bird's eye looks way too dark so I zoomed in and I could see that there were catch lights there but quite faint. I took the Dodge tool and gave one smooth brush stroke over the lighter part of the eye just to brighten it a little. I didn't want to over do it or it would have looked as if the picture had been taken with a flash.
There was one more thing to do before I flattened the image and that was to add a little sharpening. I usually use Smart Sharpen and these are the settings that worked for this image (each image needs a different amount).
You can tell by the enlarged image in the sharpen window that the Kookaburra is still on a separate layer, this is why there is that grey mesh all around the bird. The background image does not show up in the sharpen window. From the closer shot you can see the bright bit in the eye that I had made a little brighter.
The image was then flattened and my hand written signature put on the bottom - and a simple "Stroke" that makes a bit of a border. Then it was saved with a new name.
I always keep my original photographs in a folder that is saved not only to my computer but also to an external hard drive. The originals are like my "negatives" I will be able to return to them in years to come and with my newly acquired skills make and even better job of readying them for printing. I do keep the corrected ones on the external drive too - but separate from the originals.
AJ


Wednesday, January 16, 2013

A hand written signature for your photos.


I was recently asked how to make a signature in Photoshop or Photoshop Elements (any version), I am sharing the instructions I gave. 
On a white piece of paper and using a reasonably thick ballpoint or gel pen, write your signature that you wish to use on your photos as your watermark.

Either use your camera to take a photograph of the signature or use a scanner.

Open the photograph or scan in Photoshop or Photoshop Elements.

Increase the contrast to make the white and black very definite and clean up any spots or marks.

Crop the image to leave hardly any space around the signature.

Resize so the largest side is 2000 pixels (doesn't matter what the resolution is)

Click on Edit then on Define brush

In the pop up window, give the brush a name.

 The brush has now been created and is ready to be used.

Open a picture.

Click on the brush tool and using the scroll besides the illustrations of the brush shapes, scroll right down to the very bottom.

To begin with your brush will be much too large so use the slider to change the size then, when hovering over the image to be signed, use the left square bracket key on the keyboard to reduce the size further.

Select the colour with which you are to sign your picture and click in an appropriate spot to imprint your signature.

 Be consistent about where you sign your images.

AJ

Saturday, November 3, 2012

How to use a very useful filter

I have recently downloaded a free filter from http://yaelmaritz.com/extras.php that I thought might be handy when I have photographs with horribly blown out white skies. Today I have had a chance to play with that filter and since the picture I chose was far too complex for my usual methods of replacing skies I thought I might share the steps I took. You may find them useful when you come to try this yourself. (I work with Photoshop Elements 9)
Here is the picture I worked with. As you can see, the sky is filled with white clouds which were very bright. The camera had been set to brighten the bird and so made the background even more dazzling. This meant that the photo has stayed in my collection and as never been shown to anyone.
With all those twigs and leaves you can understand how difficult it may be to replace the background so lets see what my new "Kill white" filter will do.
First of all I created a duplicate layer (Ctrl + J).
Since there is white in the bird and in the twigs that are in focus I needed to make sure the filter did not remove any white from them. So I selected them. To do this I chose the Quick Selection Tool and made sure that the tool was set to add to the selection.
Now I stroked along the bird and the thin branches and the leaves making sure that I was including all the elements that I did not want to have any white removed. The soft focus and minor twiggy bits I did not save. Then I clicked on the "subtract from the selection button (to the right of the one the red arrow is pointing to) and removed from selecting the bits of sky between the bird and the twig that had been included. I had to zoom in tight to see what I was doing. Because the selection had taken time to refine I didn't want to lose it so I clicked on Select (Menu bar) and then on "Save Selection" and gave a name as requested by the drop down box. "bird"
After doing that I realised that I needed to have a blue sky to replace the white that I was going to remove. It was just as well the selection had been saved because now I have to "deselect" !
After clicking on the "eye" on the left of the layer to make it invisible, I clicked on the background layer in the Layers Palette and then added a blank layer by clicking on the "create a new layer" button (hover over the buttons and text will appear).
With a light shade of sky blue and a very light shade of the same colour I then used the gradient tool to create the sky - drag from about a third of the way down from the top right down to the bottom of the picture area with the darker colour to be at the top. If it is lighter at the top than the bottom just Ctrl +Z to undo what you have done and change the background and foreground colours by clicking on the tiny two way arrow, then drag down the image again.
Click on the empty box to replace the "eye" (the visibility) for the layer. The bird picture now hides the sky layer. Now to use that new filter! First of all I needed to put my selection around the bird and branches so I clicked on "Select" then on "Load Selection" and said "OK" to the bird selection. I I now applied the filter it would affect inside that selection - that was not what I wanted! Click on Select and then on "Inverse" to change the selection to the sky area.
This is what happened next.
How amazing is that? But there is a problem. There are a few little bits that were missed. The red arrows point to two of them. Time for another little technique.
Now I needed to create a mask and paint away those white bits.
When a mask is put onto a layer the background and foreground colours in the tools palette change to black and white. The black needs to be the forground colour. Use the little two way arrows to change it if white is the foreground colour. I had to zoom in very tight to see what I was doing and with a small soft edged brush painted away those white bits.
The results are worth it.
The picture needs to be flattened before it can be saved as a .jpg.
You can flatten in a few ways, right click in the layers palette and click Flatten Image or click on the symbol indicated in the image above and then click on Flatten Image OR go to the menu bar and click on Layer then on Flatten Image.
If I put the before and after images side by side you can see the difference.

Do you think you could improve one of your images the same way? I suggest you download the Killwhite filter, follow the instructions that come with it to install it in your program and see if you can follow my steps. If you have photos of skies (I have many!) one could be resized and used in place of the gradient layer.
If you have problems, drop me a line joanren@gmail.com
Have fun!
AJ


Monday, July 30, 2012

Stand up straight!

I deliberately took a photograph with my point and shoot camera of high rise buildings so I can show you how to correct the distortion that usually happens with the wide angle lenses these cameras have.
Here is my original photograph.
I have not bothered with any corrections at all, this is exactly as the picture came from the camera.
Because I am looking slightly upwards to include the top of the nearest building it has made all of the buildings look as if they are leaning away from me. When we look at buildings without the camera we are not aware of this being a problem but when you have an edge to a picture the distortion is really evident.
If you have either Photoshop or one of the versions of Photoshop Elements you will be able to follow my instructions on how to stand these building up straighter.
On the menu bar click on Filter and on Correct Camera Distortion (I am using Element 9 so the exact placement for Camera Distortion may be different for CS)
Make sure that the grid is visible because it really helps when trying to get the sides of the buildings straight. I noticed that when I made the right side of the large building line up with the grid that the base of the building was narrower than the top so I left a slight angle.
Further correction can be done using Free Transform
The buildings have been made a little squatter with the corrections that have been applied so they need a little more height given to them.
Take care that you do not apply too much height!
While the nodes of Free Transform are still around the picture put your left index finger on the Ctrl key on your keyboard and click the mouse onto one of the corners. By holding the Ctrl key you are able to move any one of the corners individually.

As you can see from the illustration above I moved the bottom left corner and the top right hand corner. As I moved each of those nodes I kept an eye on the main building to make sure my correction was not going to pull it over too much. It did need a little correction.
All that remains to be done is to flatten the image.
You may not have noticed but when the camera distortion correction was applied that the image became a "Layer" and that after that all corrections were being done to a layer. The image cannot be saved as a "jpg" until it is flattened. It must be flattened before you try to save it.
Here is my picture with before and after together.
You may be able to copy my first image and follow what I have done in your own Photoshop or Photoshop Elements program.
AJ


Wednesday, July 25, 2012

Giving a bird a new background

The blue skies of yesterday were replaced with almost pure white today when I took the camera out to see what was around. This sunless sky is actually perfect for taking portraits but is not really conducive to birds on branches photos! My aim was to capture a nice photo of the Little Wattle Bird but while I was waiting for the Wattle Bird to cooperate and move around to the side of the tree where I was set up a different feathered visitor arrived.
With so much brightness around it, finding the correct exposure was hit and miss for a while. I used full manual because the presets for Aperture priority were not working the way I liked!
1/25sec f/10 ISO 200
Now if anyone knows what this pretty bird is - I would appreciate you telling me!
The brilliant white of the sky really detracts from the image so I determined to change it for something more suitable. While working on the picture I decided that I should go back and make a snapshot of each of the steps so that I could share them with you - just in case you would like to do this with one of your own photos.
The first thing I did was go into my folder of "skies" - within that folder I have saved skies from every time of day and sky condition and should I need something a different colour I would change the white balance on the sky! So my collection, although not used every day of the week, is very useful.
Here is the sky I chose. It is a sky that would suit a sun-less subject such as the one I have of the bird.
Using Photoshop Elements 10 I double clicked on the picture of the bird to make it the active picture and went to Image>Magic Extractor.
 The picture opens in a new working area. The tools are on the left as in the usual work zone. The top tool is the one you use to mark what you want to keep. The recommendation is to put spots on the subject but I have much better success with drawing lines so that all the different colours are touched.
The same with the background - I make a few squiggles - more if there is more detail in the background.
Preview is clicked (top right!) to see if all I want is included and there are no transparent bits where I need opacity. Then "OK" to make the extractor do the work.
When the picture appears back in the main area of Photoshop elements I select all -  Ctrl+J - and copy it to the clipboard - Ctrl+C. Double click on the sky to make that the active image and paste from the clipboard - Ctrl+V.
To get the bird and the branches looking as clean as this on the new background it is necessary to do a bit of tidying up. I did this using a mask and brush tool.
The Layers palette is on the right of the screen. Click the square box with the pale circle in the middle to apply a mask to the layer. (Actually I took the screen shot at the wrong moment, the layer should be highlighted, not the background. Sorry about that. If the layer is not highlighted the mask will not be applied) When you get a mask the foreground and background colours change to black and white. You will need black as the foreground colour to paint onto the white mask.
Zoom in VERY close to do your cleaning up - and use a soft edged brush, not a smooth edged brush. That way the subject will blend gently into the background and not look like a cutout that has been pasted there.
Finally, the bird was sharpened (not the branches that were in softer focus) and the image was flattened and saved with a new name.

If you have any problems following these instructions, ask in the comments and I will try to help.
AJ

Saturday, May 5, 2012

Make your own cloud brushes

It may seem obvious - but first you need to take a few photos of isolated clouds!
Here is one of mine (you could download it and try with this photo if you have none!)
Step 1. Convert to black and white.
In Photoshop Elements there are a few options you can scroll through. Select the one that will give you the blackest looking sky.
In Photoshop the treatment is a little different, Click on Image>Black and white and use the sliders for Cyan to darken the blue sky to jet black.
Step 2. Clean up the sky using a soft edged brush and black. Get as close to the cloud as you can without obliterating any part of it.
Even though my blue sky looks smooth and even, when it was converted there was quite a lot of white through the black of the sky. That would show if the brush was created without painting over with black.
Step 3. Take a look at the default brush panel. Are the brushes white on black?
Absolutely not! So the next thing to do is invert the colours.
Click on Filter > Adjustments>Invert  Now you have a black cloud on a white background.
Step 4. Crop the cloud as close as you can
Take care that you do not cut any of the faded edges of the cloud or a hard line will show when you apply it in a picture. Leave a little space around the cloud.
 Step 5. If the cloud image is too large you will not be able to turn it into a brush so we need to resize it. If you follow these steps and find that your longest side is 1000 pixels or less you will not need to do any resizing.
All the steps for resizing are illustrated here. Follow the numbers sequentially.
Now we are ready to change this baby into a brush.
Step 6. Click on Edit>Define Brush.
Step 6. In the pop-up box, write a name for your brush.
 Done!
Now you are ready to use your new brush.
Open a picture that needs a cloud and click to add a new layer - the button on the extreme left of the Layers Palette.
Change you color swatches from what ever colors they are to black and white (I prefer to use cream and black because I find white to be too dazzly)
Click on the brush tool and scroll to the bottom of the brushes and click on the very last one - it is the one you have just created.
Now give one click on the sky to apply the brush.
If you do not like it, undo and resize the brush and click again.
The cloud can be moved once it is applied because it is on a layer. It can also be made less bright by sliding the Opacity from 100% to a smaller percentage.
Here is my cloud.
If you find any of these images too difficult to read, click on them and they will open larger.
There may not be many times you need home made clouds but for those few occasions when Nature does not provide the best backdrop, you are ready!
AJ    joanren@gmail.com